Visual Guides and Remedies to Cannabis Pests and Diseases
Hemp and Cannabis pests are common problems that require a serious solution. While some pests can be easily identified and treated, others are more difficult to detect. That is why you should have a general knowledge of these pests and the diseases they spread.
Being prepared for potential problems ensures you can avoid unwanted damage or loss due to poor chemical use.
Table of contents
- What Are The Most Common Cannabis Pests And Parasites?
- Cannabis Aphids
- Scale Insects
- Broad Mites
- Inchworms & Caterpillars
- Crickets
- Fungus Gnats
- Grasshoppers
- Leafhoppers
- Leaf Miners
- Mealybugs
- Planthoppers
- Russet Mites
- Slugs / Snails
- Spider Mites
- Thrips
- Whiteflies / Whitefly
- Lygus
- Berytidae
- What are the most common diseases of marijuana plants?
- Bud Rot or Mold
- Root Rot
- Leaf Septoria
- Powdery Mildew
- Tobacco Mosaic Virus (TMV)
- Verticillium Wilt
- Damping Off
- Conclusion
- FAQ
What Are The Most Common Cannabis Pests And Parasites?
1. Cannabis Aphids
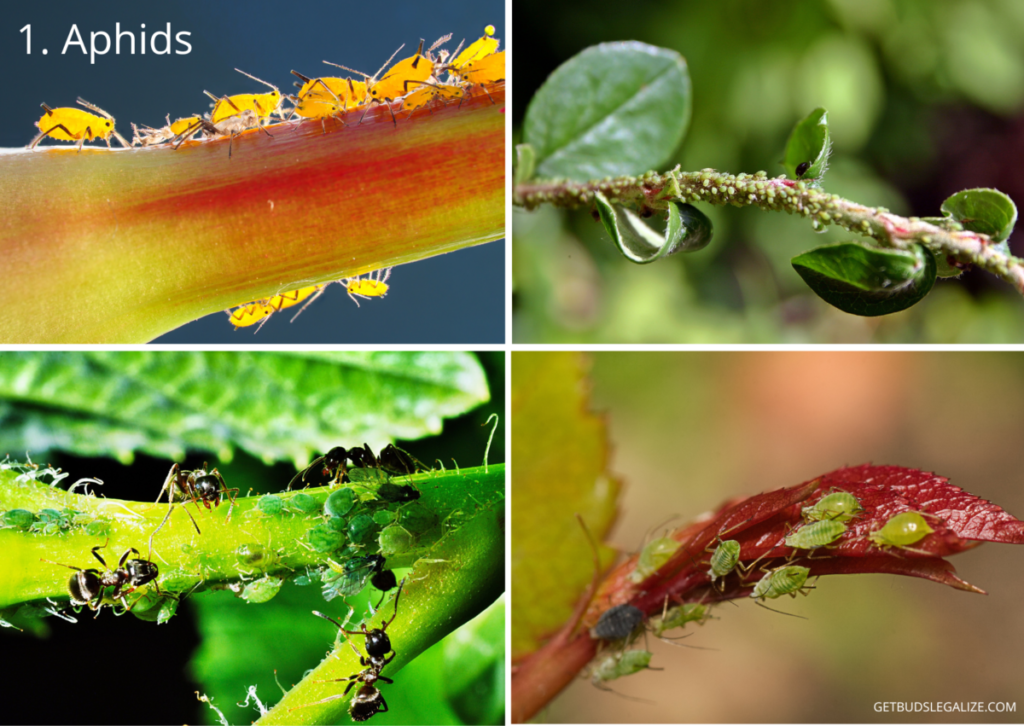
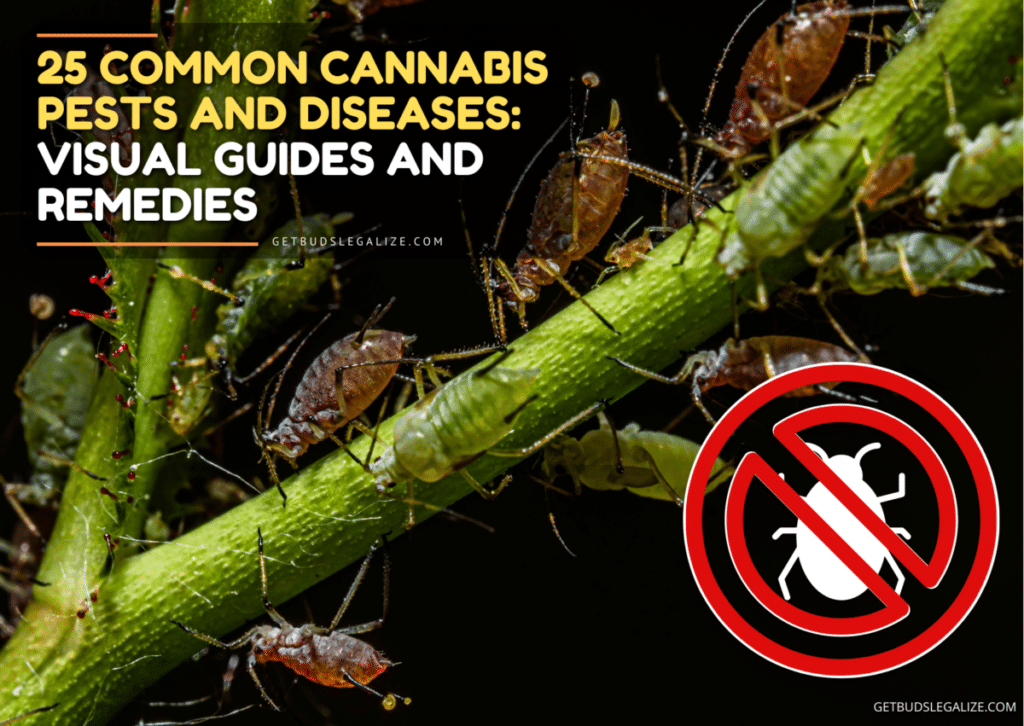
Aphids are tiny insects that feed on the sap of plants, including cannabis. They can cause serious damage to your crop by weakening the plant, spreading diseases and viruses, and attracting other pests. Aphids come in different colors, such as green, black, yellow, or pink, and can have wings or not. They usually hide on the stems or underside of the leaves.
How to identify Aphids on cannabis plants?
To identify aphids on cannabis, you need to inspect your plants regularly and look for signs of infestation. Some of the symptoms of aphid damage are:
- Yellowing, curling, wilting, or dropping of leaves
- Stunted growth or deformed buds
- A sticky substance called honeydew on leaves or stems
- Black sooty mold growing on honeydew
- Ants crawling on plants (they feed on honeydew)
- White skins shed by aphids
- Small holes or bite marks on leaves
If you see any of these signs, check your plants closely for aphids. They are very small (1-3 mm) and can be hard to spot with the naked eye. You may need a magnifying glass or a microscope to see them clearly. You can also shake your plants gently over a white paper or cloth and see if any aphids fall off.
How to Get Rid of Aphids on Cannabis
If you find aphids on your cannabis plants, you need to act fast to prevent them from spreading and causing more damage. There are several methods you can adopt to get rid of aphids:
- Spray your plants with water: A strong jet of water can dislodge many aphids from your plants. You can use a hose or a spray bottle for this method. Make sure to spray both sides of the leaves and repeat every few days until you see no more aphids.
- Spray your plants with vinegar: Vinegar is acidic and can kill some aphids by disrupting their pH balance. You can mix one part vinegar with three parts water and spray your plants with this solution once a week. Be careful not to spray too much or too often as vinegar can also harm your plants if used excessively.
- Spray your plants with insecticidal soap: Insecticidal soap is a natural product that kills soft-bodied insects like aphids by dehydrating them. You can buy ready-made insecticidal soap or make your own by mixing one tablespoon of mild liquid soap (such as castile soap) with one quart of water. Spray your plants thoroughly with this solution every few days until you see no more aphids. Make sure to rinse off any residue after spraying.
- Use sticky traps: Sticky traps are yellow cards coated with glue that attract and trap flying aphids. You can hang them near your plants or place them on stakes around your garden. Replace them when they get full of insects.
- Use chemical pesticides: Chemical pesticides are synthetic substances that kill insects by poisoning their nervous system. They are effective but also harmful to humans, animals, and beneficial insects. You should only use chemical pesticides as a last resort when other methods fail. Follow the instructions carefully and when applying them wear protective gear.
- Use natural predators: Natural predators are living organisms that feed on aphids and help control their population naturally. Some examples of natural predators are ladybugs, lacewings, parasitic wasps, hoverflies, spiders, birds, etc. You can buy them online from reputable sources. or attract them to your garden by planting flowers that they like (such as marigolds).
2. Scale Insects
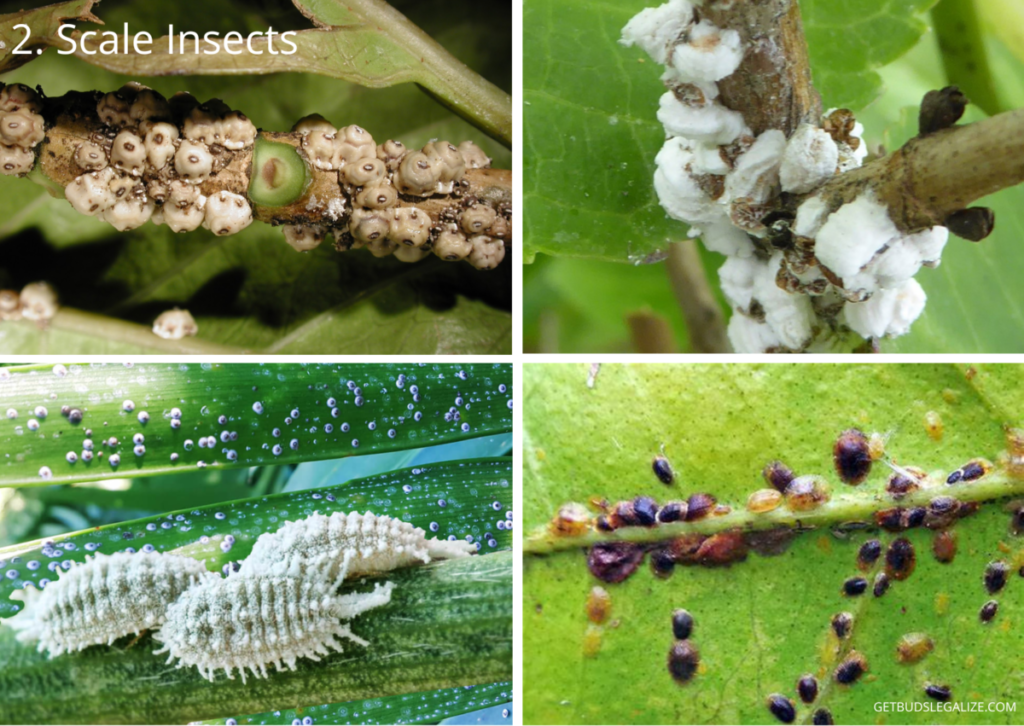
Scale insects are one of the most common and destructive pests that can infest cannabis plants. They are small, round, or oval-shaped bugs that attach themselves to the stems, leaves, and buds of the plant and suck out its sap. They can cause stunted growth, yellowing, wilting, curling, and dropping of leaves, reduced yield and quality, and even death of the plant if left untreated.
There are many types of scale insects that can affect cannabis plants, but two of the most prevalent ones are the mealybug and the brown soft scale insect. The mealybug is white or grayish in color and has a waxy or cottony appearance. It usually clusters on the underside of leaves or near leaf joints. The brown soft-scale insect is brown or tan in color and has a smooth, dome-shaped body. It usually congregates on the stems or branches of the plant.
Both types of scale insects produce a sticky substance called honeydew as they feed on the plant’s sap. This honeydew attracts ants and other insects, as well as fungi that cause sooty mold to grow on the plant’s surface. Sooty mold reduces photosynthesis and makes the plant look unsightly.
How to identify Scale Insects?
The best way to detect scale insects on cannabis plants is to inspect them regularly for any signs of infestation. Look closely at the stems, leaves, and buds for any bumps, spots, or clusters of bugs that may indicate scale insects. You may also notice honeydew or sooty mold on your plants if they have been attacked by scale insects.
If you suspect you have scale insects on your cannabis plants, you can confirm it by using a magnifying glass or a microscope to examine them more closely. You can also try scraping off some of them with your fingernail or a toothpick to see if they move or bleed when disturbed.
How to Get Rid of Scale Insects on Cannabis Plants
Scale insects are notoriously difficult to eliminate once they have established themselves on your cannabis plants. Their hard shells protect them from many insecticides and their immobility makes them hard to reach with sprays.
However, there are some methods that can help you control or eradicate scale insects from your cannabis plants:
- Physical removal: You can manually remove scale insects from your plants by using a strong jet of water, a soft brush, tweezers or cotton swabs dipped in alcohol. This method is time-consuming and tedious but effective if done thoroughly and regularly.
- Biological pest control: You can introduce natural predators or parasites that feed on scale insects into your grow area. These include ladybugs, lacewings, geocoris, parasitic wasps, and predatory mites. You can buy these beneficial organisms online or from local garden centers.
- Organic pesticides: You can use organic pesticides that contain ingredients such as neem oil, insecticidal soap, or spinosad to spray your plants with. These products work by suffocating, dissolving, or poisoning scale insects without harming your plants or leaving residues behind. However, you need to apply them frequently and thoroughly for the best results.
- Prevention: You can prevent scale insects from infesting your cannabis plants by keeping them healthy and stress-free with proper watering, feeding, pruning, and ventilation. You should also avoid bringing infected plants into your grow area or using contaminated tools or soil without sterilizing them first.
3. Broad Mites
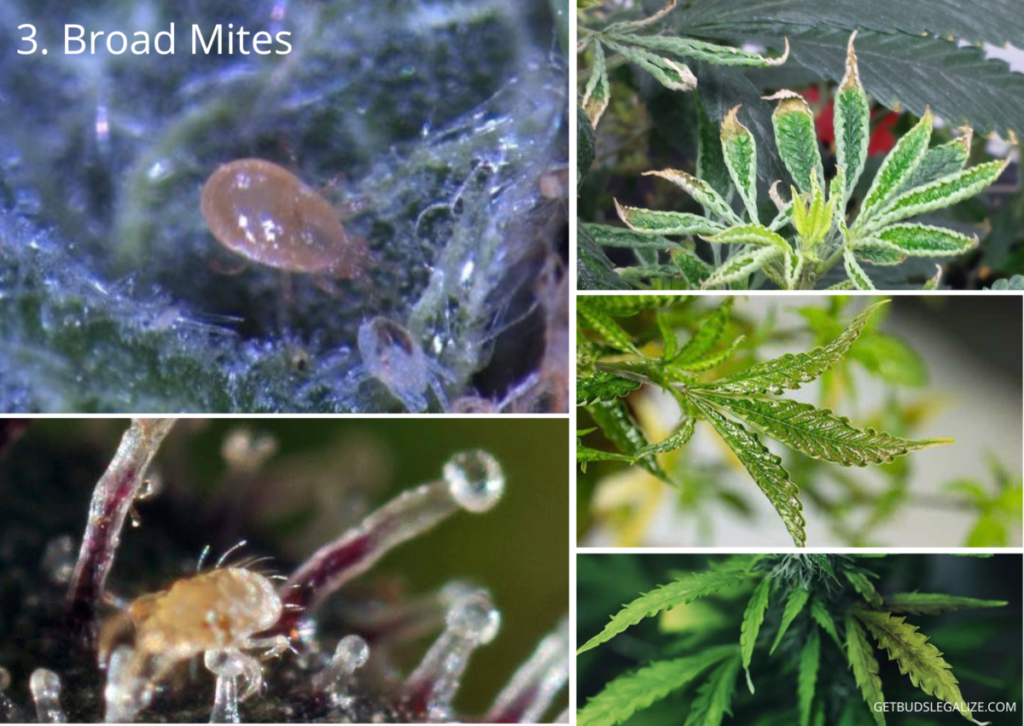
Broad mites are tiny pests that can infest cannabis plants and cause serious damage. They are so small that they are almost impossible to see with the naked eye, and they often hide on the underside of new leaves or inside buds.
Broad mites (Polyphagotarsonemus latus) are microscopic arachnids that belong to the Tarsonemidae family. They can attack a wide range of plants, including fruits, vegetables, and ornamental plants and have become more common on cannabis crops as cannabis cultivation has increased in popularity and legality.
Broad mites feed on the sap of young plant tissue, leaving behind a toxic saliva that causes malformations and stunts the growth of cannabis plants. They reproduce rapidly and can spread quickly from plant to plant by wind or contact.
How to identify broad mites on cannabis plants?
The best way to identify broad mites on cannabis is by using a magnifying glass or microscope with at least 60x magnification. You may be able to spot them as tiny white dots on the underside of new leaves or inside buds. They have six legs when young and eight legs when adults.
However, because broad mites are so hard to see, you may notice their symptoms before you see them. Some of the signs of broad mite infestation include:
- Yellowing foliage and stems
- Curling and/or drooping leaves
- Blistered or “wet” looking leaves
- Twisted or deformed new growth
- Stunted growth
- Brown or dead buds
These symptoms can be easily confused with other problems such as nutrient deficiencies, pH imbalances, heat stress, or root issues. Therefore, it is important to confirm the presence of broad mites before starting any treatment.
How to get rid of cannabis broad mites?
Getting rid of broad mites on cannabis can be challenging because they are resistant to many common pesticides and miticides. They also lay their eggs inside the plant tissue, which makes it difficult to kill them completely.
However, there are some effective ways to treat broad mite infestations on cannabis plants:
- Cut off any infected parts of the plant and dispose of them carefully.
- Spray your plants with a miticide/pesticide that is labeled for broad mites. Some examples are azadirachtin (neem oil), abamectin (Avid), spiromesifen (Forbid), pyrethrins (PyGanic), or horticultural oils.
- Apply the spray more often than usual (every 2-3 days) until you see no signs of broad mites for at least two weeks.
- Spray your plants when the lights go out or in low light conditions to avoid burning them.
- Use a preventive spray every week after treating an infestation to prevent re-infestation.
- Keep your grow area clean and well-ventilated.
- Quarantine any new plants before introducing them to your growing space.
- Monitor your cannabis plants regularly for any signs of pests.
Remember that prevention is always better than cure. Keep your growing environment clean and healthy, check your plants regularly for any problems, and use natural products whenever possible.
4. Inchworms & Caterpillars
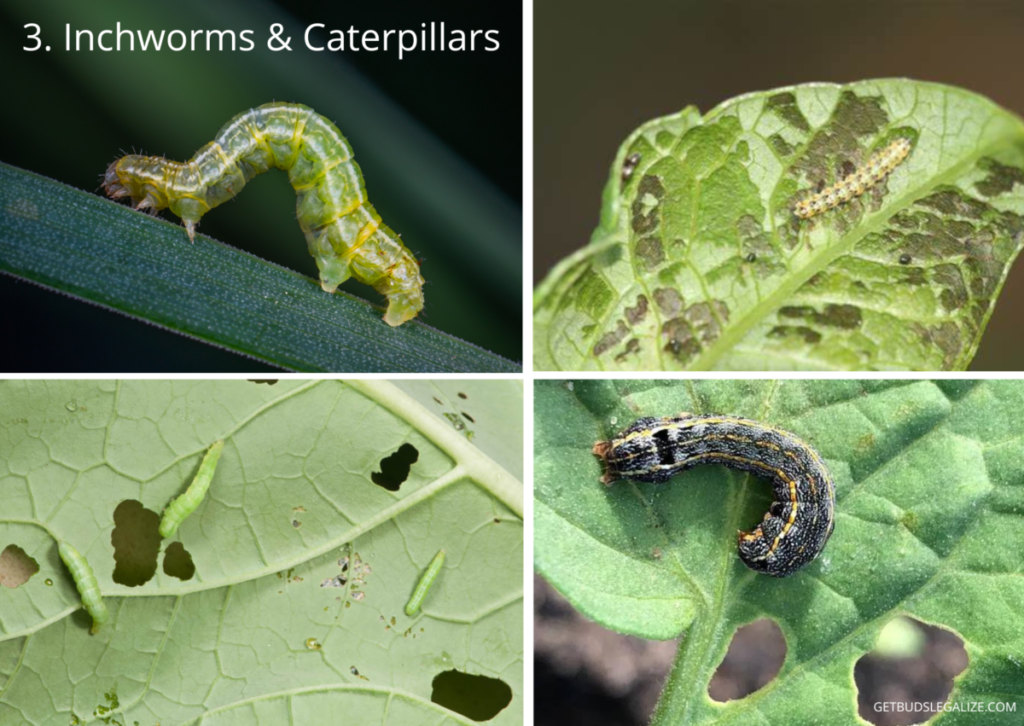
If you are growing cannabis outdoors, you may encounter some unwelcome visitors to your plants: inchworms and caterpillars. These pests can cause significant damage to your cannabis leaves and buds, and even introduce diseases or mold.
Inchworms and caterpillars are the larval stages of various moths and butterflies. They have soft bodies with multiple legs, and they feed on plant matter. There are many different species of inchworms and caterpillars, some of which are more harmful to cannabis than others. Some of the most common ones that attack cannabis plants are:
- Corn borer: A yellowish-brown caterpillar with dark spots that bore into stems and buds.
- Hemp borer: A pinkish-white caterpillar with black stripes that tunnels into stems and buds.
- Zebra caterpillar: A black-and-white striped caterpillar that eats leaves.
- Saltmarsh caterpillar: A hairy brown caterpillar that eats leaves.
- Cabbage looper: A green caterpillar with white stripes that loops its body when moving.
How to identify Inchworms & Caterpillars on cannabis plants?
The first sign of an inchworm or caterpillar infestation is usually seeing holes or chunks missing from your cannabis leaves. You may also notice black or brown droppings (frass) on your leaves or buds, which are the excrement of these pests. If you look closely, you may also spot the actual inchworms or caterpillars hiding under the leaves, inside the buds, or on the stems.
Another sign of an inchworm or caterpillar infestation is seeing signs of bud rot or mold on your buds. This can happen when a pest burrows into a bud and creates an entry point for moisture and pathogens. The affected bud will turn brown, mushy, and smelly.
How to treat inchworms and caterpillars on your cannabis plants?
The best way to treat inchworms and caterpillars on your cannabis plants is to use a safe and effective biological insecticide called BT spray (Bacillus Thuringiensis). This spray contains a bacteria that kills larvae by disrupting their digestive system. It does not harm beneficial insects, pets, children, or plants.
To use BT spray, simply mist it thoroughly over your entire plant, especially the undersides of leaves where pests tend to hide. Repeat every week until you see no more signs of infestation. You can also apply it more often if there is a heavy infestation or after heavy rain (which washes away the spray). BT spray is safe to use up until harvest day.
Another option is to use Spinosad products (derived from soil bacteria), which can also kill other insects like aphids, spider mites, thrips, or whiteflies. However, Spinosad products are not as effective against inchworms and caterpillars as BT spray.
Prevention tips:
To prevent future infestations of inchworms and caterpillars on your cannabis plants:
- Inspect your plants regularly for signs of pests or damage
- Remove any infected leaves or buds as soon as possible
- Keep your plants healthy with proper watering, feeding, pruning, etc.
- Avoid overwatering or overcrowding your plants
- Use companion plants like marigolds or lavender to repel pests
- Use netting or row covers to protect your plants from flying insects
5. Crickets
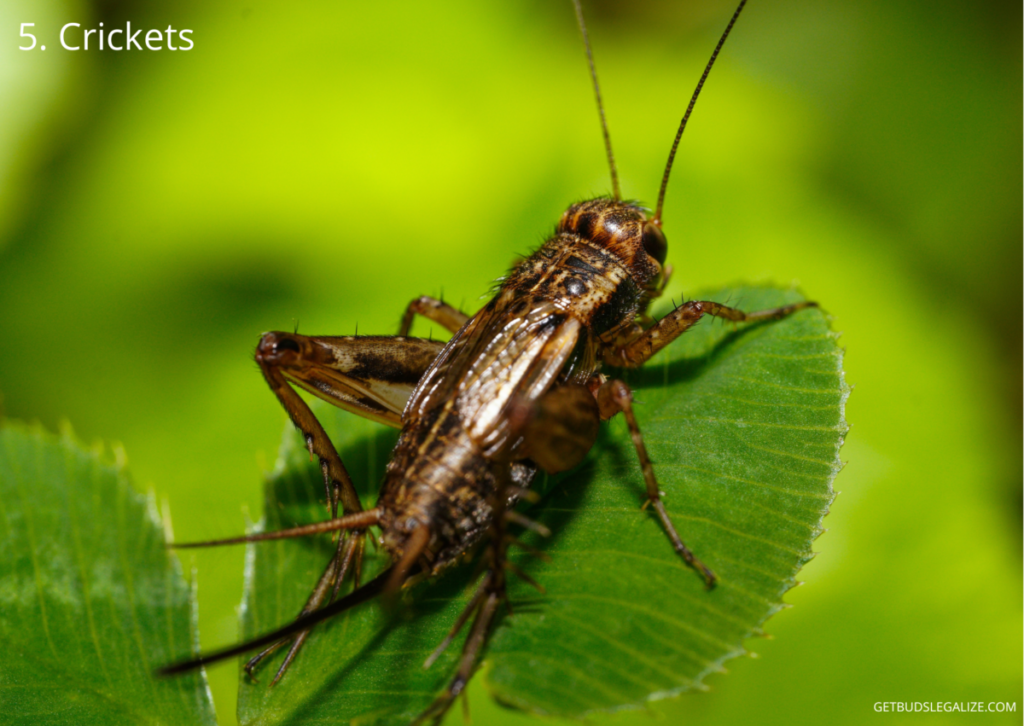
If you are growing cannabis outdoors, you may encounter some unwanted visitors that can damage your plants. One of these pests is the cricket, which can chew on your leaves, flowers, stems, and roots.
There are different types of crickets that can affect cannabis plants, but the most common ones are the house cricket and the mole cricket. The house cricket is about an inch long, with a brown or black color, long antennae, and wings. It lives above ground and feeds on fresh plant material at night. The mole cricket is slightly smaller, with a grayish-brown color, short antennae, and shovel-like forelegs. It lives underground and feeds on plant roots.
How to identify Crickets?
Both types of crickets can cause visible damage to your cannabis plants. You may notice small holes or jagged edges on your leaves and flowers, where the crickets have been nibbling. You may also see signs of tunneling near the base of your plants or around the pots if you have mole crickets. And of course, you may hear their loud chirping at night.
How to Get Rid of Crickets on Cannabis Plants
If you have a few crickets on your cannabis plants, you may not need to worry too much. They are not very picky eaters and they may move on to other food sources if they are available. However, if you have a large infestation or if they are causing significant damage to your plants, you need to act fast.
There are several ways to get rid of crickets on cannabis plants:
- Cricket Bait & Traps: You can use commercial or homemade bait or traps to lure and capture crickets. These usually contain food or pheromones that attract crickets and then trap them inside a container or sticky surface. You can place these around your plants or near their hiding places. Make sure to check them regularly and dispose of the dead crickets.
- Spinosad: This is an organic insecticide that kills crickets by ingestion or contact. It affects their nervous system and causes paralysis and death. It is safe for pets, children, and beneficial insects when used according to instructions. You can spray it directly on your plants or soil where the crickets are feeding.
- Diatomaceous Earth: This is a natural substance made from fossilized algae that have sharp edges that cut through the exoskeletons of insects like crickets. It causes them to dehydrate and die. You can sprinkle it around your plants or pots where the crickets are crawling.
- Neem Oil: This is another natural insecticide that repels and kills many pests including crickets. It also has anti-fungal properties that protect your plants from diseases. You can mix it with water and spray it on your plants or soil where the crickets are feeding.
How to Prevent Crickets on Cannabis Plants
The best way to deal with crickets on cannabis plants is to prevent them from infesting your garden in the first place. Here are some tips:
- Keep Your Garden Clean: Remove any debris, leaf litter, mulch, or garbage that can provide shelter or food for crickets. Also, avoid leaving lights on at night as they attract insects.
- Use Barriers: You can use physical barriers like netting, fencing, or row covers to protect your plants from flying or jumping insects like house crickets.
- Introduce Predators: You can introduce natural predators like birds, frogs, lizards, spiders, or parasitic wasps that feed on insects like crickets. You can attract them by providing water sources, nesting sites, or flowering plants.
- Rotate Crops: If you grow other crops besides cannabis in your garden, you can rotate them every year so that pests do not build up resistance or preference for certain plants.
6. Fungus Gnats
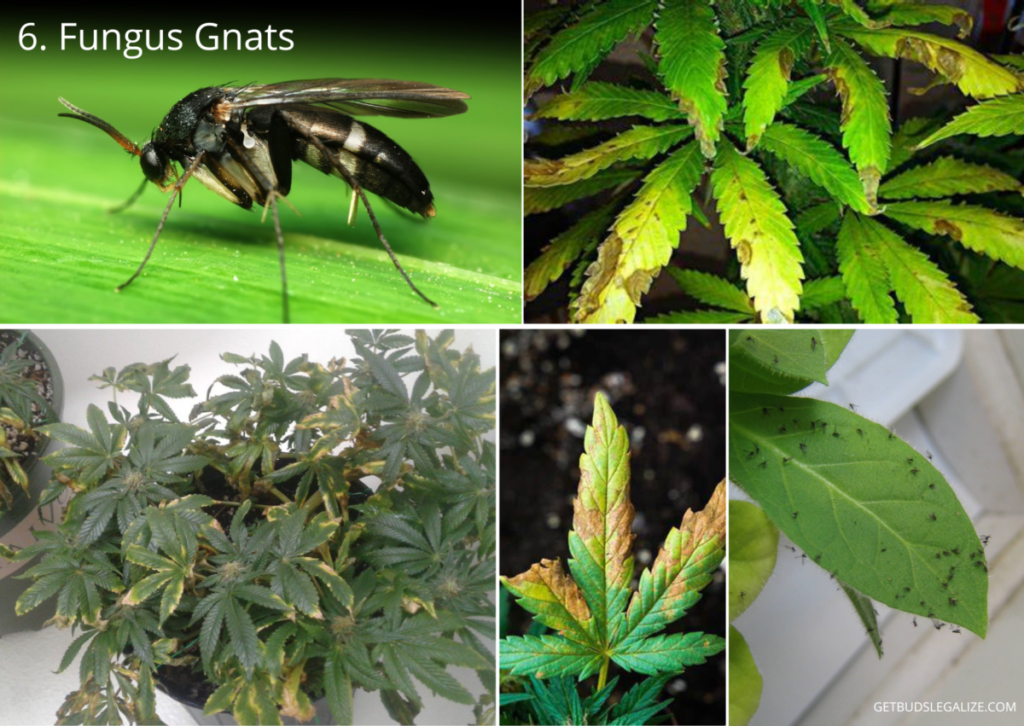
If you grow cannabis in soil, you may have encountered fungus gnats at some point. These tiny flying pests can be a nuisance and a threat to your plant’s health and yield.
Fungus gnats are small, dark-colored insects that look like mosquitoes with transparent wings. They are about 2 mm long and can be found swarming around moist soil or standing water. Fungus gnats have a short life cycle of 18 to 30 days, during which they can lay up to 300 eggs in the top layer of wet soil. The eggs hatch into larvae, which feed on decaying organic matter, fungus, and plant roots. The larvae then pupate and emerge as adults, ready to mate and lay more eggs.
Fungus gnats are not only annoying but also harmful to cannabis plants. The adult gnats do not damage the plants directly, but they can carry diseases or pathogens that can infect your plants. The larvae are more destructive, as they chew on the roots and reduce the plant’s ability to absorb water and nutrients. This can cause symptoms such as wilting, yellowing, stunted growth, or even death of young seedlings or clones. Fungus gnats can also affect the quality and quantity of your harvest by stressing your plants and lowering their resistance to other pests or diseases.
How to identify fungus gnats on cannabis plants?
The easiest way to spot fungus gnats on cannabis plants is by looking for their presence around the soil surface or near drainage holes. You may also see them flying around your grow room or tent when you disturb the soil or water your plants. To confirm that you have fungus gnats and not other similar-looking insects such as thrips or whiteflies, you can use yellow sticky traps. These traps attract and capture adult gnats with their bright color and adhesive surface. You can place them near your pots or hang them above your canopy level. If you see many small black flies stuck in the traps, you have a fungus gnat problem.
Another way to check for fungus gnat larvae is by examining the soil closely. You may see tiny white worms with black heads crawling around the topsoil or near the roots. You can also use a magnifying glass or microscope to see them better. Alternatively, you can use potato slices as bait. Cut some thin slices of raw potato and place them on top of the soil. After a few hours, lift them up and look for any larvae that have been attracted by the starch. If you find any, dispose of them immediately.
How to prevent fungus gnats on cannabis plants?
The best way to prevent fungus gnats on cannabis plants is by avoiding overwatering. Overwatering creates moist conditions that favor fungal growth and gnat reproduction. To avoid overwatering, you should always let the top inch of your soil dry out before watering again. You can also use a moisture meter, weigh your pots, lift them up, or poke your finger into the soil to check for dryness. Provide adequate drainage by using pots with holes at the bottom, placing them on saucers or trays, elevating them with bricks or stones, adding perlite or vermiculite to your soil mix, or using fabric pots.
Another way to prevent fungus gnats on cannabis plants is by keeping your grow area clean and sterile.
- Remove any dead leaves, stems, buds, mulch, or debris from your pots and floor.
- Sanitize your tools, containers, and equipment with alcohol, bleach, or hydrogen peroxide before using them.
- Avoid bringing any infected plants, soil, or compost into your grow room or tent. You should also quarantine any new clones or seedlings
7. Grasshoppers
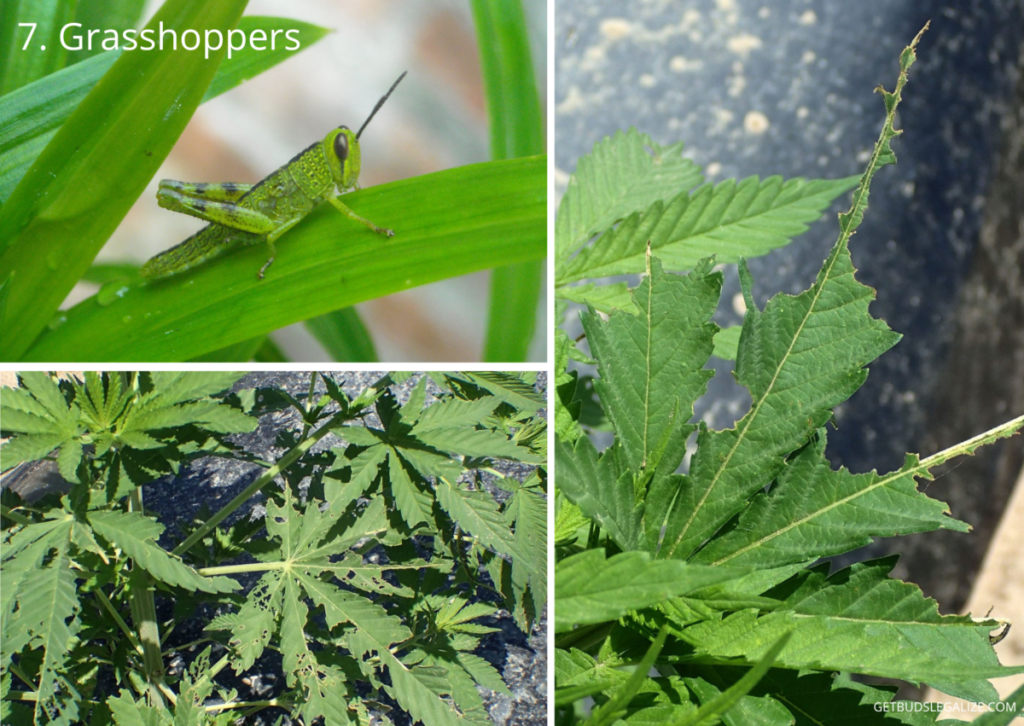
Grasshoppers are one of the oldest and most common pests that can attack cannabis plants. They have a strong appetite for green vegetation and can cause significant damage to your crop if left unchecked.
Grasshoppers can be hard to spot because they blend in with the foliage and move quickly when disturbed. However, they leave behind some distinctive signs of their presence, such as:
- Holes and tears on leaves and stems
- Puncture marks on the stem where they suck out the sap
- Dirt mounds around the base of plants where they burrow underground
- Droppings that look like black pellets
If you notice any of these symptoms on your cannabis plants, you should inspect them closely for grasshoppers and take action as soon as possible.
How to Treat Grasshopper Infestations
There are several ways to get rid of grasshoppers from your cannabis plants, depending on the severity of the problem and your preference. Some of the most effective methods are:
- Spinosad: This is an organic insecticide derived from a soil bacterium that kills grasshoppers by affecting their nervous system. It is safe for humans, pets, and beneficial insects, but not for commercial growers. You can spray it directly on your plants or apply it as a soil drench.
- Fatty acid salts or insecticidal soaps: These are natural products that weaken the outer shell of grasshoppers and cause them to dehydrate. They are also safe for plants and beneficial insects but may need repeated applications.
- Neem oil: This is a plant-based oil that repels grasshoppers by disrupting their hormonal balance and feeding behavior. It also has antifungal and antibacterial properties that protect your plants from diseases. You can mix it with water and soap and spray it on your plants every few days.
- Diatomaceous earth: This is a fine powder made from fossilized algae that cut through the exoskeleton of grasshoppers and cause them to bleed out. It is harmless to humans, pets, and beneficial insects but may irritate your lungs if inhaled. You can sprinkle it around your plants or mix it with water and spray it on them.
How to Prevent Grasshopper Damage
The best way to avoid grasshopper problems is to prevent them from reaching your cannabis plants in the first place. Some of the preventive measures you can take are:
- Row covers: These are mesh or fabric materials that cover your plants and block access to grasshoppers. They allow light, air, and water through but keep pests out. You can use them during the vegetative stage or early flowering stage when your plants are most vulnerable.
- Soil care and housekeeping: Keeping your growing area clean and well-maintained can deter grasshoppers from settling there. You should remove weeds, debris, mulch, or anything else that provides shelter or food for them. You should also keep the soil firm and moist by tamping it down or watering it regularly.
- Companion planting: This is a technique of growing different crops together that benefit each other in some way. For example, you can plant garlic, onion, basil, mint, sage, rosemary, or marigold near your cannabis plants to repel grasshoppers with their strong smells. You can also plant flowers like sunflowers, cosmos, or zinnia to attract birds, ladybugs, or praying mantis that prey on grasshoppers.
8. Leafhoppers
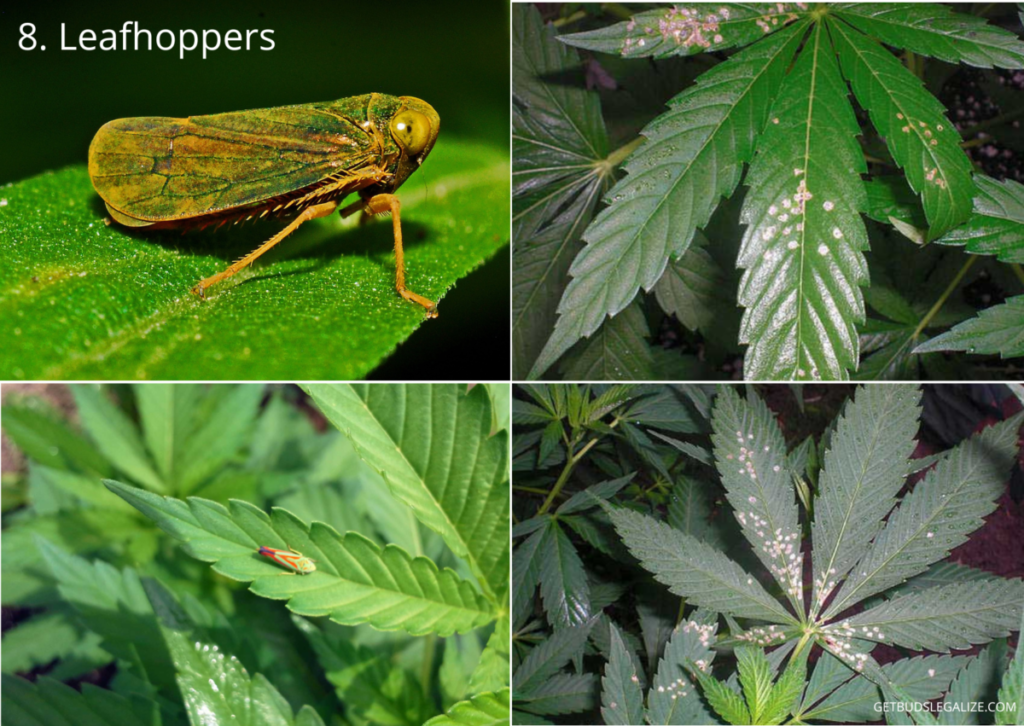
If you grow cannabis outdoors, you may encounter some unwanted visitors to your plants. One of them is the leafhopper, a small insect that feeds on the sap of cannabis leaves and can cause damage and stress to your plants.
Leafhoppers are members of the Cicadellidae family, which includes over 20,000 different species. They are usually less than one centimeter long and come in various colors and patterns. They have two wings that fold down their body, six legs (the rear two are used for hopping), short antennae, and two eyes at the top of their head.
Leafhoppers feed by piercing the outer skin of cannabis leaves and sucking out the sap inside. This can leave white and brown spots on the leaves, which may look like nutrient deficiencies or fungal infections. Some species of leafhoppers can also transmit diseases or viruses to cannabis plants, such as beet curly top virus.
How to treat leafhoppers on cannabis
Leafhoppers are not very difficult to get rid of if you act quickly. Here are some methods you can use to eliminate them from your cannabis plants:
- Spray your plants with water or a jet of air to knock off the leafhoppers from the leaves. You can also use a vacuum cleaner or a sticky trap to catch them.
- Apply organic insecticides such as neem oil, pyrethrin, or spinosad to your plants. These products will kill or repel the leafhoppers without harming your plants or beneficial insects.
- Introduce natural predators such as ladybugs, lacewings, or parasitic wasps to your garden. These insects will feed on the leafhoppers and reduce their population.
- Cover your plants with fine mesh netting or row covers to prevent new leafhoppers from landing on them.
How to prevent leafhoppers on cannabis
The best way to avoid leafhopper problems is to prevent them from infesting your plants in the first place. Here are some tips you can follow to keep them away:
- Keep your plants healthy and well-watered. Leafhoppers prefer dry and stressed plants that have more sap concentration.
- Remove any weeds or debris around your plants that may harbor leafhoppers or their eggs.
- Rotate your crops every year to avoid building up pest populations in one area.
- Monitor your plants regularly for signs of leafhopper damage or activity. If you spot any, act fast before they spread too much.
Leafhoppers are not a major threat to cannabis plants if they are controlled early and effectively. However, if left unchecked, they can cause significant damage and stress to your plants by reducing their photosynthesis ability, weakening their immune system, and exposing them to diseases or viruses.
Therefore, it is important that you identify and treat leafhoppers as soon as possible if you find them on your cannabis plants. By following our guide above, you should be able to get rid of these pests easily and safely.
9. Leaf Miners
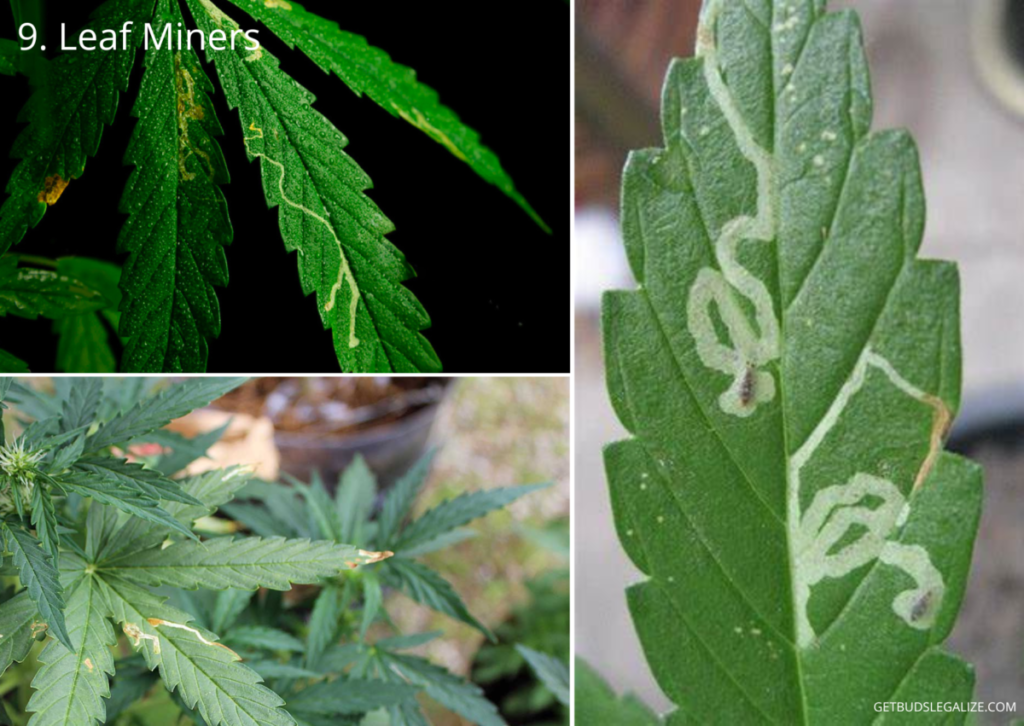
If you are growing cannabis plants, you may encounter a pest problem that can affect the health and yield of your crops: leaf miners. Those are not specific species of insect, but rather a term for the larvae of various bugs that lay their eggs inside the leaves of plants. These larvae then feed on the leaf tissue, creating tunnels or trails that look like squiggly lines on the surface of the leaves.
Leaf mining can be caused by different types of insects, such as moths, flies, beetles, or sawflies. The most common one that affects cannabis plants is a type of fly called Liriomyza Trifolii, which is native to the Caribbean and the United States but can also be found in other regions of the world. Leaf miners prefer warm conditions and can thrive in temperatures around 30°C. They can affect both indoor and outdoor plants but are especially problematic in greenhouses where they can easily spread.
How to Identify Leaf Miners
The main symptom of leaf miners is the presence of white or yellow trails on the leaves, which indicate where the larvae have eaten their way through. These trails may vary in shape and size depending on the type of insect that caused them. Sometimes, you may also see small holes or spots on the leaves where the adult flies have pierced them to feed or lay eggs.
Leaf miner damage may not be very noticeable at first, but it can reduce the photosynthesis and vigor of your plants over time. It can also make your plants more susceptible to other diseases or pests by weakening their natural defenses. If left untreated, leaf miners can cause significant losses in yield and quality.
How to Get Rid of Leaf Miners
Fortunately, leaf miners are not very difficult to control if you act quickly and use effective methods. Here are some tips for treating and preventing leaf miners on your cannabis plants:
- Remove affected leaves: This is a simple way to reduce the population of leaf miners and prevent further damage. You can either remove the whole leaf or just crush the larvae inside by pressing your fingers along the trail.
- Use organic insecticides: There are some natural products that can kill leaf miners by ingestion or contact without harming your plants or beneficial insects. One example is spinosad, which is derived from a soil bacteria and affects the nervous system of leaf miners. Another example is neem oil, which has anti-fungal and anti-bacterial properties as well as repelling many pests. However, neem oil should not be used on flowering plants as it can leave an unpleasant taste and smell on buds.
- Use sticky traps: These are yellow cards coated with glue that attract adult flies with their color. By placing them near your plants, you can trap and monitor leaf miner activity and reduce their reproduction rate.
- Use biological control: There are some natural enemies that can prey on leaf miners or parasitize their larvae. These include ladybugs, lacewings, predatory mites, and wasps. You can either introduce these beneficial insects into your garden or create favorable conditions for them by planting companion plants such as marigolds or dill.
Leaf miners are not a serious threat to your cannabis plants if you detect them early and apply appropriate measures.
10. Mealybugs
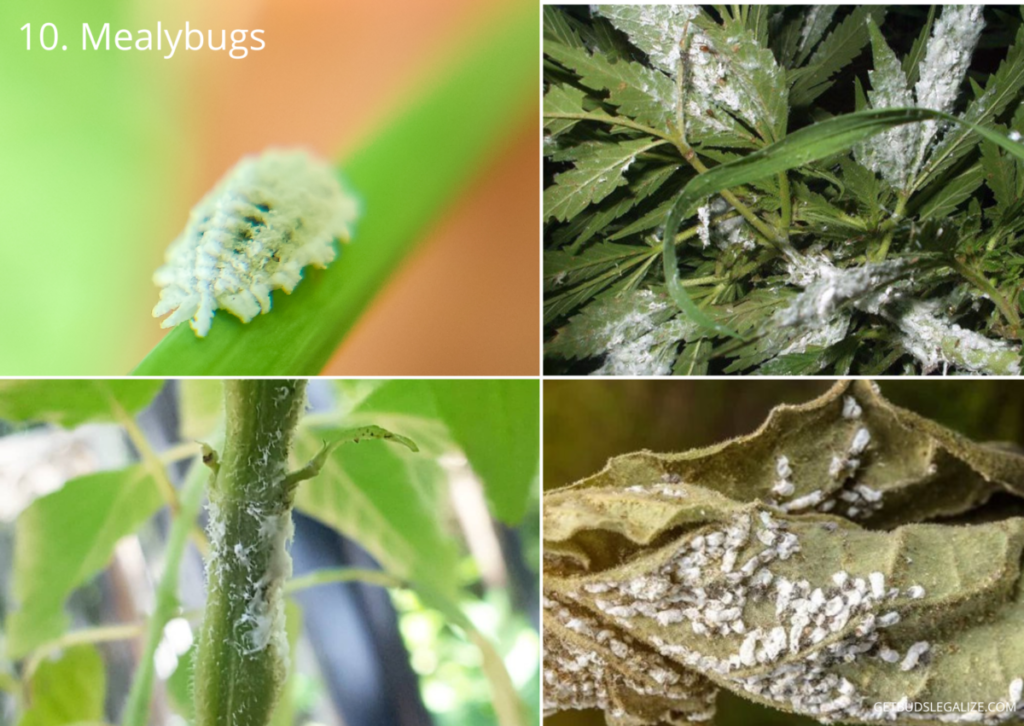
If you are growing cannabis plants, you may encounter some annoying pests that can harm your crops and reduce your yield. One of these pests is the mealybug, a small white fuzzy insect that feeds on the sap of your plants.
Mealybugs are soft-bodied insects that belong to the same family as aphids and scales. They are usually about a quarter inch long and have an oval shape. They have a whitish-gray coating of wax that gives them a fluffy appearance. They also produce white cottony masses that contain their eggs.
Mealybugs feed on the sap of cannabis plants by piercing their stems and leave with their mouthparts. They suck out the nutrients and water from the plant tissues, causing them to weaken and wilt. Mealybugs also excrete a sticky substance called honeydew, which attracts ants and other insects. Honeydew can also cause black sooty mold to grow on the plant surfaces, interfering with photosynthesis.
How to identify mealybugs on cannabis plants?
The most obvious sign of mealybugs on cannabis plants is the presence of white fluffy clumps on the stems and leaf joints. These clumps are either adult mealybugs or their egg sacs. You may also see tiny yellow nymphs crawling around your plants.
Another sign of mealybugs is honeydew residue on your plant leaves or pots. This residue may look shiny or wet, and it may attract ants or other insects. If you see black sooty mold growing on your plant leaves, it may indicate a severe infestation of mealybugs.
How to prevent mealybugs on cannabis plants?
The best way to prevent mealybugs on cannabis plants is to maintain good hygiene and sanitation in your growing area. Here are some tips:
- Inspect regularly your plants for any signs of pests or diseases.
- Remove any dead or damaged plant parts promptly.
- Avoid overwatering or overfertilizing your plants, as this can make them more susceptible to pests.
- Use clean pots, tools, and soil when transplanting or repotting your plants.
- Quarantine any new plants before introducing them to your growing area.
- Avoid bringing any infested plant material into your growing area.
How to treat mealybugs on cannabis plants?
If you find mealybugs on your cannabis plants, you need to act quickly before they spread and cause more damage. There are several natural methods that you can use to get rid of these pests without harming your crops or yourself:
- Manually remove as many mealybugs as possible by spraying them with water or wiping them off with a cloth or cotton swab dipped in alcohol.
- Apply neem oil solution, insecticidal soap, rubbing alcohol, diatomaceous earth, predatory bugs, or homemade solutions such as vinegar-water spray or garlic-chili spray. Follow the instructions carefully for each method and avoid getting any product on your buds.
- Repeat the treatment every few days until you see no more signs of mealybugs.
- Monitor your plants for any recurrence of infestation.
11. Planthoppers
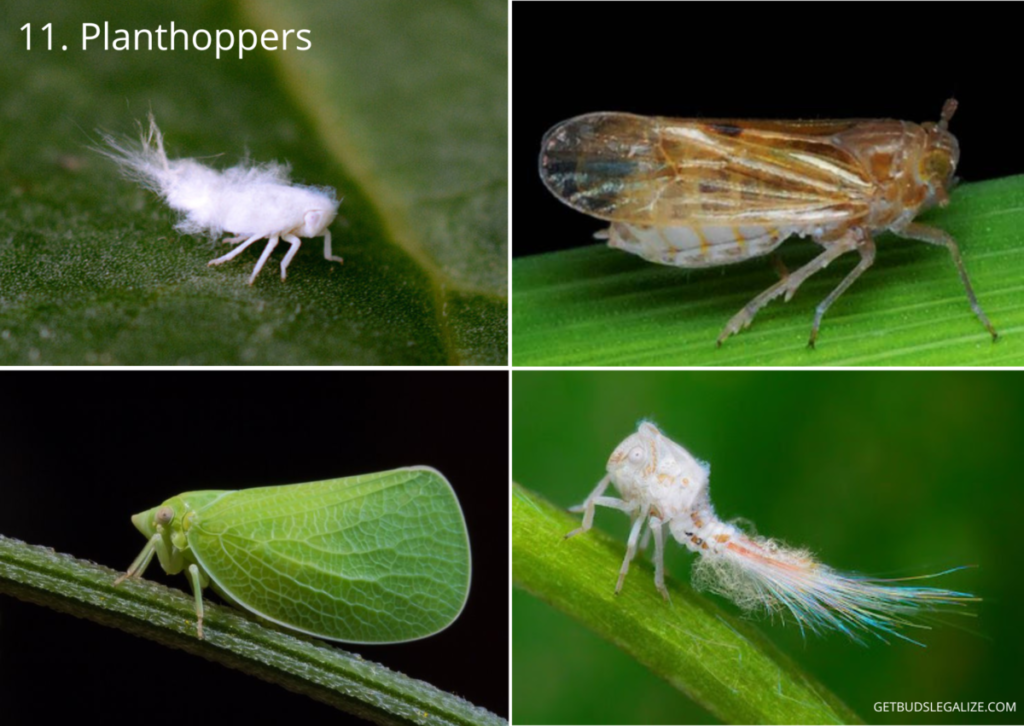
Planthoppers are small insects that feed on plant sap and secrete a white, waxy substance that resembles cotton or mold. They can infest cannabis plants and cause damage to the leaves, stems, and buds. They can also transmit plant diseases such as phytoplasmas, which can affect the growth and yield of your crop.
Planthoppers come in different shapes, sizes, and colors depending on their species and life stage. They usually have elongated bodies with wings that fold over their backs. Some of them have prominent spines or horns on their heads or tails. They can be green, brown, yellow, pink, or black.
The most common sign of planthopper infestation is the presence of white fluffy material on your cannabis plants. This is not mold or mildew, but rather a protective secretion that the planthoppers produce to deter predators and prevent water loss. You may also notice yellowing, curling, or wilting of the leaves, as well as stunted growth or deformed buds.
To confirm that you have planthoppers on your cannabis plants, you need to look closely at the underside of the leaves and along the stems. You may see tiny nymphs (immature planthoppers) crawling around or hiding under the white substance. They may have red eyes or antennae that resemble hermit crab claws. You may also see adult planthoppers flying or jumping away when disturbed.
How to Get Rid of Planthoppers on Cannabis
Planthoppers are not very difficult to control if detected early. However, if left untreated, they can multiply quickly and cause significant damage to your cannabis plants. Here are some effective methods to get rid of planthoppers on cannabis:
- Spinosad: This is an organic insecticide derived from a soil bacterium that kills planthoppers by affecting their nervous system. It is safe for humans, pets, and beneficial insects, but toxic to bees and aquatic life. You can spray spinosad products directly on your plants where you see planthoppers or their white secretions. Make sure to cover all parts of the plant thoroughly.
- Insecticidal soap: This is another organic option that works by dissolving the outer layer of the planthopper’s body and causing dehydration. You can make your own insecticidal soap by mixing 1 teaspoon of mild liquid soap with 1 quart of water. Spray it on your plants every few days until you see no more signs of planthopper activity.
- Neem oil: This is a natural oil extracted from neem seeds that have insecticidal and fungicidal properties. It repels planthoppers and other pests by disrupting their feeding and reproduction. You can mix 1 ounce of neem oil with 1 gallon of water and spray it on your plants once a week until you get rid of them.
- Predators: There are some natural enemies that feed on planthoppers such as ladybugs, lacewings, spiders, and parasitic wasps. You can attract them to your garden by planting flowers such as marigolds, daisies, or sunflowers near your cannabis plants. You can also buy them online or from local nurseries and release them in your grow area.
Prevention Tips:
The best way to avoid planthopper problems is to prevent them from infesting your cannabis plants in the first place. You can do this by keeping your plants healthy and stress-free with proper watering, feeding, and pruning practices. You can also inspect your plants regularly for any signs of pests or diseases and remove any infected parts promptly.
12. Russet Mites
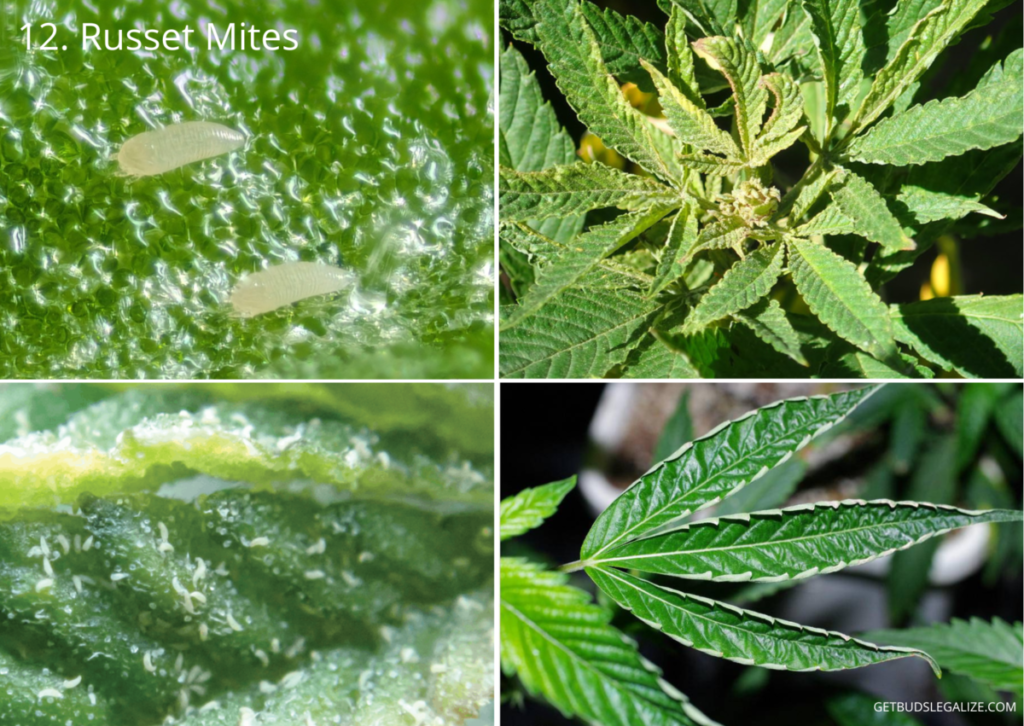
Russet mites are tiny pests that can wreak havoc on your cannabis plants if left unchecked. They are so small that you need a microscope or a jeweler’s loupe to see them, but they can cause serious damage to your leaves, stems, and buds by sucking out their sap and nutrients.
Russet mites belong to the Eriophyidae family and are closely related to tomato mites. They are also known as hemp russet mites or Aculops Cannabicola. They prefer dry and warm climates and can spread easily by wind or by hitching a ride on other insects or clothing.
How to Identify Russet Mites on Cannabis
Russet mites can be hard to spot at first because they do not leave visible signs of their presence like webs or bites. Instead, they hide in the cracks and crevices of the plant tissue and feed from the inside out.
The symptoms of russet mite infestation may resemble other problems such as overwatering, nutrient deficiency, heat stress, or tobacco mosaic virus. Some of the signs to look for are:
- Yellowing of leaves
- Browning of leaves
- Curling of leaves
- Drooping of leaves
- Stunted growth
- The bronze coloration of leaves and stems
- Light brown spots on the buds
The best way to confirm if you have russet mites is to use a magnifying device and inspect the lower parts of the plant first, as they tend to start from there and move upwards. You may see tiny white worm-like creatures crawling on the surface or near the veins of the leaves.
How to Get Rid of Russet Mites on Cannabis
Russet mites can be difficult to eradicate because they lay eggs inside the plant tissue and have a short life cycle of about 30 days at 80 F. Therefore, you need to act fast and use multiple methods to eliminate them completely.
Some of the possible treatments for russet mites are:
- Neem oil: This is a natural insecticide that can kill russet mites by disrupting their hormonal balance and preventing them from reproducing. However, it may not be effective against eggs or adults that have developed resistance. You need to spray neem oil every few days until you see no signs of infestation.
- Predatory mites: These are beneficial insects that feed on russet mites and other cannabis pests. You can introduce them into your grow area as a biological control method. Some examples are Phytoseiulus Persimilis, Amblyseius Swirskii, and Neoseiulus Californicus. However, you need to make sure that your environment is suitable for them (not too hot or dry) and that you do not use any chemical pesticides that may harm them.
- Heat: Russet mites cannot survive high temperatures above 110 F. You can use this method as a preventive measure by heating up your grow room before planting or during the early stages of growth. You can also apply heat directly to infested areas using a hair dryer or a heat gun. However, be careful not to damage your plants with excessive heat.
- Diatomaceous earth: This is a natural substance made from fossilized algae that have sharp edges that cut through the exoskeletons of russet mites and dehydrate them. You can sprinkle diatomaceous earth around your plants or mix it with water and spray it on affected areas. However, it may lose its effectiveness when wet or clogged with dust.
- Chemicals: If all else fails, you may resort to using synthetic pesticides that are designed for russet mite control. Some examples are abamectin, spiromesifen and bifenazate. However, these chemicals may have negative effects on your health, environment, and plant quality. You should always follow the instructions carefully and wear protective gear when handling them.
Can Plants Recover from Russet Mites?
Depending on how severe the infestation is, your plants may recover from russet mite damage if you treat them early enough. However, some damage may be irreversible such as reduced yield, potency, and flavor.
13. Slugs / Snails
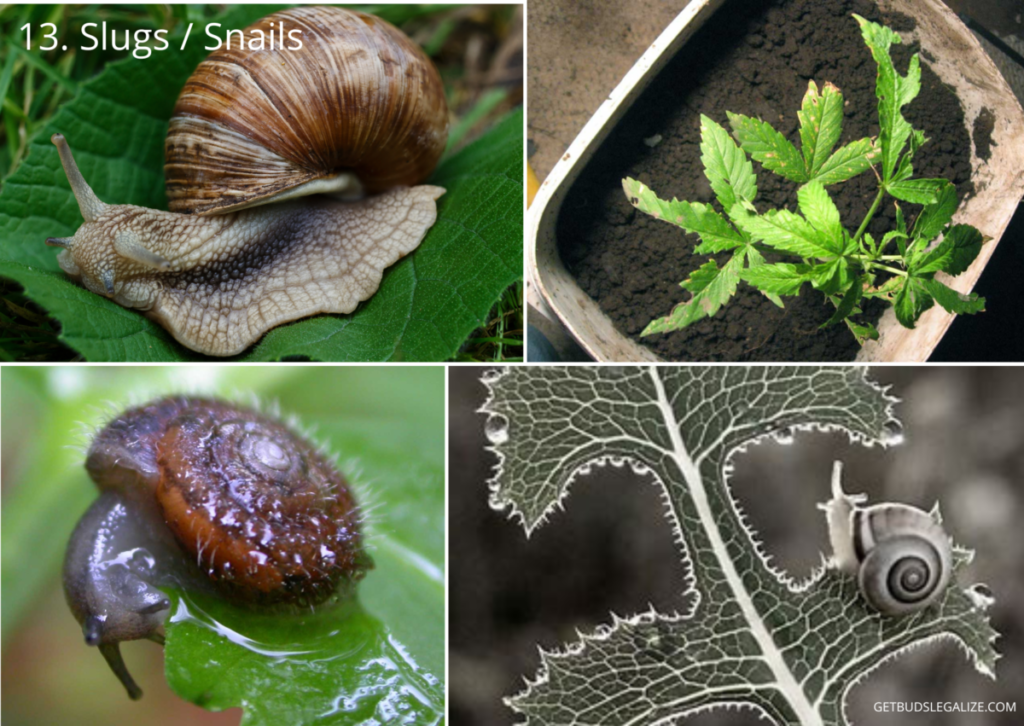
If you are growing outdoors, you may encounter some unwanted visitors that can damage your plants: slugs and snails. These slimy creatures are herbivores that feed on the tender leaves of your cannabis plants, leaving large and ragged holes behind. They can also devour entire seedlings if left unchecked. In this article, we will show you how to identify, prevent and remove slugs and snails from your cannabis garden, using organic and non-lethal methods.
How to Identify Snails and Slugs on Cannabis Plants
Slugs and snails are both molluscs that belong to the class Gastropoda. The main difference between them is that snails have a coiled shell on their backs, while slugs do not. They both have a muscular foot that allows them to move around at a slow pace of around one millimeter per second. They also have jaws and bands of thousands of microscopic teeth that they use to rasp off leaf particles.
The signs of slug and snail damage on cannabis plants are:
- Large and ragged holes in tender leaves
- Damage in early spring, before many other insects have to appear
- Silver slime trails on chewed leaves and the ground
- Leaves on seedlings are completely gone
- Scalloped (serrated) edges
How to Remove Slugs and Snails on Cannabis Plants
If prevention fails, you may need to take action against slugs and snails that have already infested your cannabis plants. There are some organic methods that you can use to get rid of these pests without harming your plants or the environment, such as:
- Hand-picking: This is the most labor-intensive but effective method of removing slugs and snails from your plants. You will need gloves or tweezers to pick them off one by one during the night or early morning when they are most active. You can then dispose of them by rehoming them far away from your garden or drowning them in salt water.
- Beer traps: Slugs and snails love beer because it contains yeast that attracts them. You can use this weakness against them by setting up beer traps around your plants. Simply fill shallow containers with beer (or yeast mixed with water) and bury them slightly into the soil so that only the rims are exposed. The slugs and snails will crawl into the traps for a drink but won’t be able to get out.
- Nematodes: These are microscopic worms that parasitize slugs and snails by entering their bodies through natural openings. They then release bacteria that kill their hosts within a few days. You can buy nematodes online or at garden centers as a biological control agent for slugs
How to Prevent Slugs and Snails on Cannabis Plants
The best way to deal with slugs and snails is to prevent them from reaching your plants in the first place. There are several ways to deter these pests from your cannabis garden, such as:
- Rehoming: If you find any slugs or snails on your plants or nearby, you can gently pick them up with gloves or tweezers and relocate them to another area where they won’t harm your crop.
- Copper barriers: Slugs and snails don’t like copper because it gives them an electric shock when they touch it. You can use copper tape or wire to create barriers around your pots or beds that will keep them away from your plants.
- Eggshells and diatomaceous earth: These materials have sharp edges that can cut through the soft bodies of slugs and snails, causing them to dehydrate and die. You can sprinkle crushed eggshells or diatomaceous earth around your plants as a natural repellent.
- Companion plants: Some plants can help protect your cannabis from slugs and snails by either attracting their predators (such as birds, frogs, or hedgehogs) or by emitting odors that they dislike (such as garlic, mint, or rosemary). You can plant these companions near your cannabis plants for added defense.
14. Spider Mites on weed plants
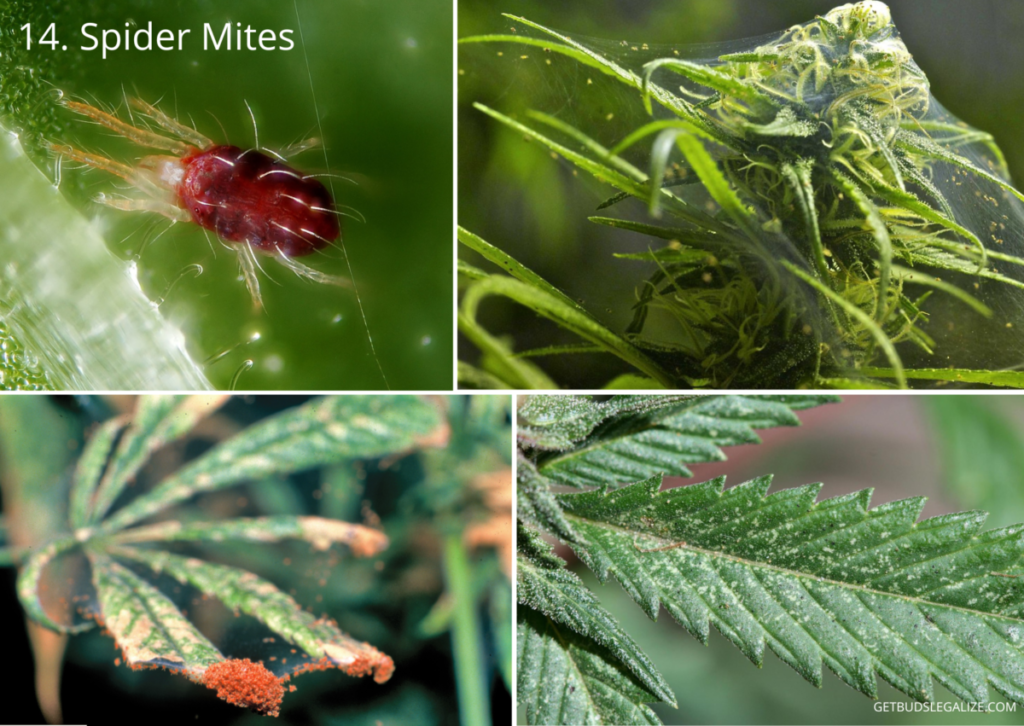
Spider mites are tiny pests that can wreak havoc on your cannabis plants. They feed on the plant sap, causing yellow or white spots on the leaves, stunted growth, and reduced yields. They also produce webs that can cover your buds and branches, making them unappealing and prone to mold.
If you suspect that your cannabis plants have spider mites, you need to act fast to get rid of them before they multiply and damage your entire crop. Here are some steps you can take to identify and eliminate spider mites from your cannabis garden.
How to Identify Spider Mites
Spider mites are very small and difficult to see with the naked eye because they are very small. They usually live on the underside of the leaves, where they lay their eggs and spin their webs. To spot them, you need a magnifying glass or a microscope. Look for these signs of spider mite infestation:
- Tiny white or yellow spots on the leaves, which are bite marks from the mites
- Small white eggs on the leaf surface or along the leaf veins
- Thin silk webs covering parts of the plant
- Visible mites moving around on the leaves or webs
How to Get Rid of Spider Mites
There are several methods you can use to get rid of spider mites from your cannabis plants. Some are natural and organic, while others involve using chemical pesticides. Here are some options you can try:
- Wash down your plants with a strong jet of water early in the morning. This will dislodge some of the mites and their eggs from the leaves. You can also lower the pH of your water to 3-4 by adding vinegar or citric acid, which will make it more acidic and harmful to the mites.
- Use a contact pesticide spray like insecticidal soap or neem oil. These products kill mites on contact by suffocating them or disrupting their hormonal balance. You need to spray directly on the mites and their eggs, covering both sides of the leaves thoroughly. Repeat every few days until no signs of mites remain.
- Use a homemade spider mite killer made from water and garlic. Garlic contains sulfur compounds that repel and kill spider mites. To make this spray, blend a few cloves of garlic with water and strain it through a cheesecloth. Spray it on your plants every three days until you get rid of all the mites.
- Switch between treatments every three days to prevent them from adapting. Spider mites can develop resistance to certain pesticides if they are exposed to them repeatedly. By alternating between different products or methods, you can keep them off guard and increase your chances of success.
How to Prevent Spider Mites
The best way to deal with spider mites is to prevent them from infesting your cannabis plants in the first place. Here are some tips you can follow to keep your plants healthy and pest-free:
- Keep your grow room clean and sanitized. Remove any dead leaves or debris that could harbor spider mites or their eggs. Disinfect any tools or equipment that come into contact with your plants.
- Maintain optimal temperature and humidity levels in your grow room. Spider mites thrive in hot and dry conditions. By keeping your temperature below 80°F (27°C) and your humidity above 50%, you can discourage them from settling on your plants.
- Improve air circulation in your grow room. Spider mites hate windy environments because they make it harder for them to spin their webs. By using fans or vents, you can create air movement that will blow away some of the mites and their webs.
- Introduce beneficial insects that prey on spider mites such as ladybugs, lacewings, predatory thrips, or predatory spiders. These natural enemies will help control spider mite populations by feeding on them or their eggs.
- Inspect your plants regularly for any signs of spider mite infestation. The sooner you detect them, the easier it will be to get rid of them.
15. Thrips
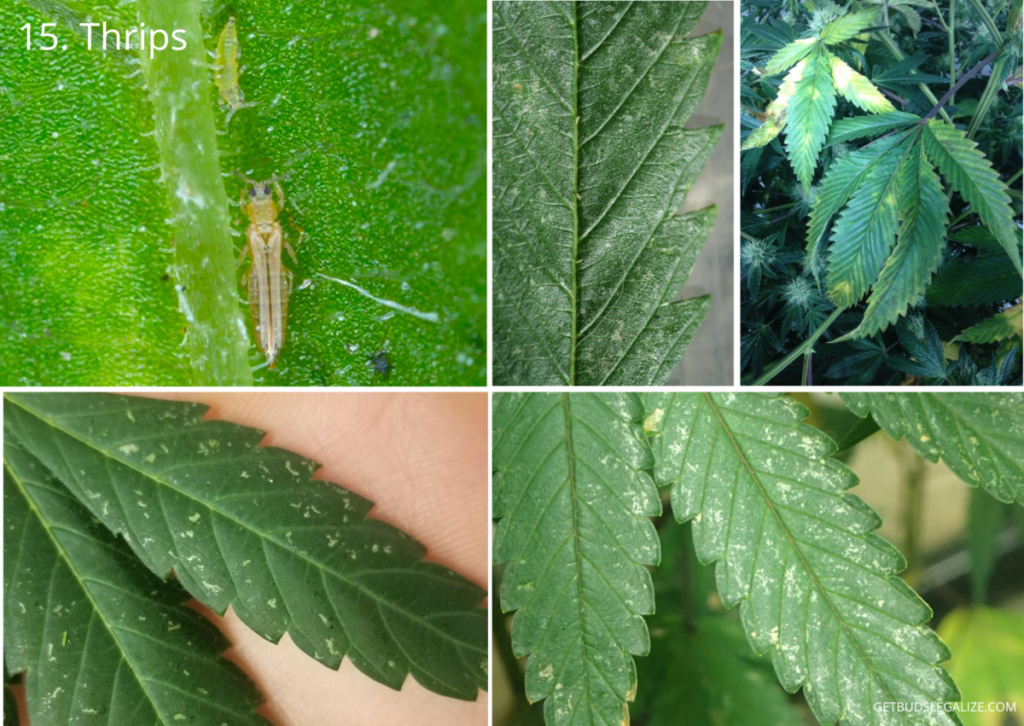
Thrips are tiny insects that feed on plant sap by puncturing the leaves or stems of cannabis plants. They can cause damage to the plant’s appearance, growth, and yield by creating irregular-shaped bites, white spots, scarring, wilting, and brittleness on the leaves. Thrips can also transmit diseases between plants and survive harsh conditions by hiding in crevices or plant material.
They are more common in indoor or greenhouse environments where they have fewer natural predators and more favorable temperatures. They can be hard to spot due to their small size and fast movement, but they can be identified by their worm-like nymphs or dark wings. They can also be detected by using sticky traps near the plants or around the perimeter of the growing area.
How to Get Rid of Thrips
If you already have a thrip infestation, you need to act quickly and effectively to get rid of them. The first step is to kill the larvae in the substrate by irrigating with a biological insecticide such as Beauveria Bassiana or Metarhizium Anisopliae. This will stop thrips from reproducing and spreading further.
The next step is to kill the adult thrips on the plant by spraying with a contact insecticide such as pyrethrins or rotenone. However, you should be careful with these chemicals as they can be toxic to bees and other beneficial insects. You should also avoid spraying your buds directly as this can affect their quality and safety.
Another option is to introduce predatory species such as Amblyseius Cucumeris, parasitic wasps, or Orius that can feed on thrips and reduce their population naturally. These predators can be purchased online or from specialized stores and released into your grow area according to their instructions.
Thrips are one of the most common pests in cannabis cultivation, but they can be prevented and controlled with proper care and attention.
How to Prevent Thrips on cannabis plants
The best way to prevent thrips from infesting your cannabis plants is to keep them clean and spaced out from other plants. You should also spray your plants once with a natural insecticide such as neem oil or potassium soap before they enter the flowering stage. This will help deter thrips and other pests from attacking your buds.
16. Whiteflies / Whitefly
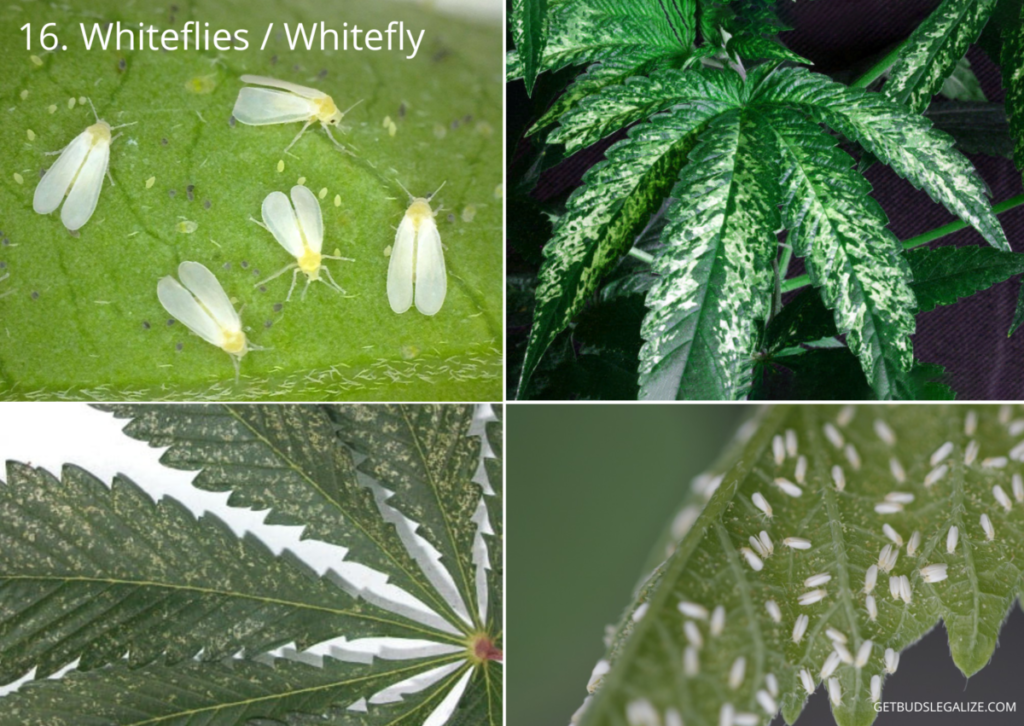
If you are growing cannabis, you may encounter some common pests that can damage your plants and affect your yield. One of these pests is the whitefly, a tiny insect that feeds on the sap of cannabis leaves and spreads diseases. In this blog post, we will show you how to identify, prevent and control whiteflies on cannabis plants.
Whiteflies are small, winged insects that belong to the same family as aphids, mealybugs, and scales. They have a triangular shape and a white or pale yellow color. They are usually found on the underside of cannabis leaves, where they suck out the sap and excrete a sticky substance called honeydew.
Whiteflies can cause several problems for cannabis plants:
- They reduce the plant’s vigor and growth by draining its nutrients.
- They attract other pests like ants, wasps, and sooty mold that feed on honeydew.
- They transmit viral diseases like yellow mosaic virus and leaf curl virus that can stunt or kill cannabis plants.
There are many species of whiteflies that can infest cannabis plants, but the most common ones are:
- Greenhouse whitefly (Trialeurodes vaporariorum): This species has four wings that lie flat on its body when resting. It prefers warm and humid conditions and can reproduce year-round in greenhouses or indoor grows.
- Silverleaf whitefly (Bemisia tabaci): This species has four wings that stick out at an angle when resting. It is more resistant to pesticides and can survive colder temperatures. It can also cause the silvering or yellowing of cannabis leaves due to its saliva.
How to identify whiteflies on cannabis plants?
The easiest way to spot whiteflies on cannabis plants is to look at the underside of the leaves. You may see clusters of tiny white insects or their eggs, which look like small yellow dots. You may also notice honeydew droplets or sooty mold on the leaf surface.
Another way to detect whiteflies is to shake or disturb your plants gently. The insects will fly away in a cloud of dust-like particles. You can also use a magnifying glass or a smartphone camera to get a closer look at them.
How to control whiteflies on cannabis plants?
If you already have a whitefly infestation, you need to act fast before it spreads further. Here are some methods you can use:
- Pruning: Cut off any infected leaves or branches and dispose of them safely. This will reduce the number of whiteflies and their food source.
- Hosing: Spray your plants with water using a hose or a spray bottle. This will knock off some of the insects and wash away honeydew and sooty mold.
- Beneficial insects: Introduce natural predators like ladybugs, lacewings, or predatory mites that feed on whiteflies and their eggs. You can buy them online or from garden centers.
- Spinosad: Use an organic insecticide derived from soil bacteria that kills whiteflies by disrupting their nervous system. You can apply it as a foliar spray or as a soil drench every 7–10 days until the infestation is gone.
How to prevent whiteflies on cannabis plants?
The best way to avoid whitefly infestations is to prevent them from entering your grow area in the first place. Here are some tips:
- Regularly inspect your plants for signs of disease or pests.
- Quarantine any new plants before introducing them to your grow room or greenhouse.
- Use clean tools and equipment when handling your plants.
- Avoid overwatering or overfertilizing your plants, as this can attract whiteflies.
- Keep your grow area well-ventilated and maintain optimal temperature and humidity levels.
- Remove any dead or diseased plant material from your grow area.
- Use sticky traps, yellow cards, or reflective mulches to trap or repel whiteflies.
17. Lygus
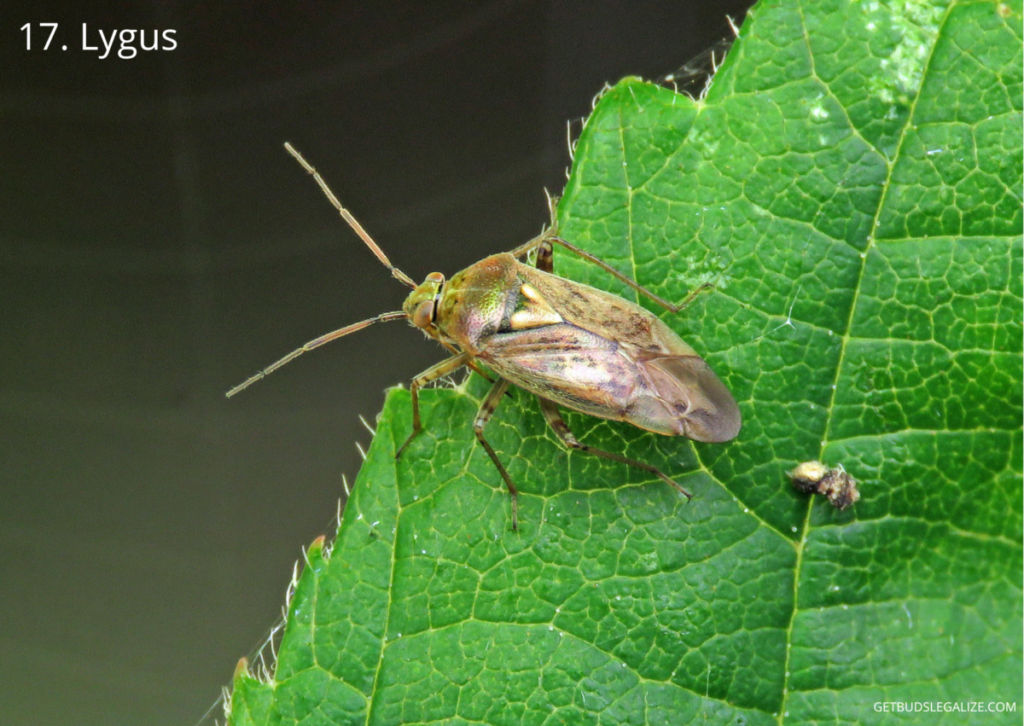
Lygus bugs are small, oval-shaped insects that feed on the leaves of your plants and can cause serious damage if left unchecked. Their color can vary from pale green to reddish brown or black. Adults can be either solid or mottled and have a distinctive triangle or V shape on the back.
Insects are capable of flight, so they often run away when approached. Nymphs are wingless and pale green in color, often mistaken for aphids, but have tougher exoskeletons and typically more active lifestyles than their predecessors.
How to get rid of Lygus on cannabis plants?
If you already have Lygus bugs on your cannabis plants, you may need to use more aggressive methods to get rid of them. One option is to blast them off with a high-powered hose but be careful not to damage your buds during the flowering stage.
Another option is neem oil which is an organic bio-pesticide that has been deemed safe for use on vegetables and other flowering plants Neem oil works by disrupting the hormonal system of insects making them unable to feed reproduce or molt You can spray neem oil directly onto your affected plants following label instructions Repeat this process over several days to kill both adult and nymph stages
There are also some chemical pesticides registered for use against Lygus bugs on hemp but not all of them may be suitable for cannabis Check the label carefully before applying any pesticide product.
How to prevent Lygus on cannabis plants?
The best way to prevent Lygus bugs from invading your cannabis plants is by maintaining good sanitation and weed control around your grow area. Remove any potential host plants that may attract Lygus bugs, such as alfalfa, quinoa, clover, or mustard.
18. Berytidae
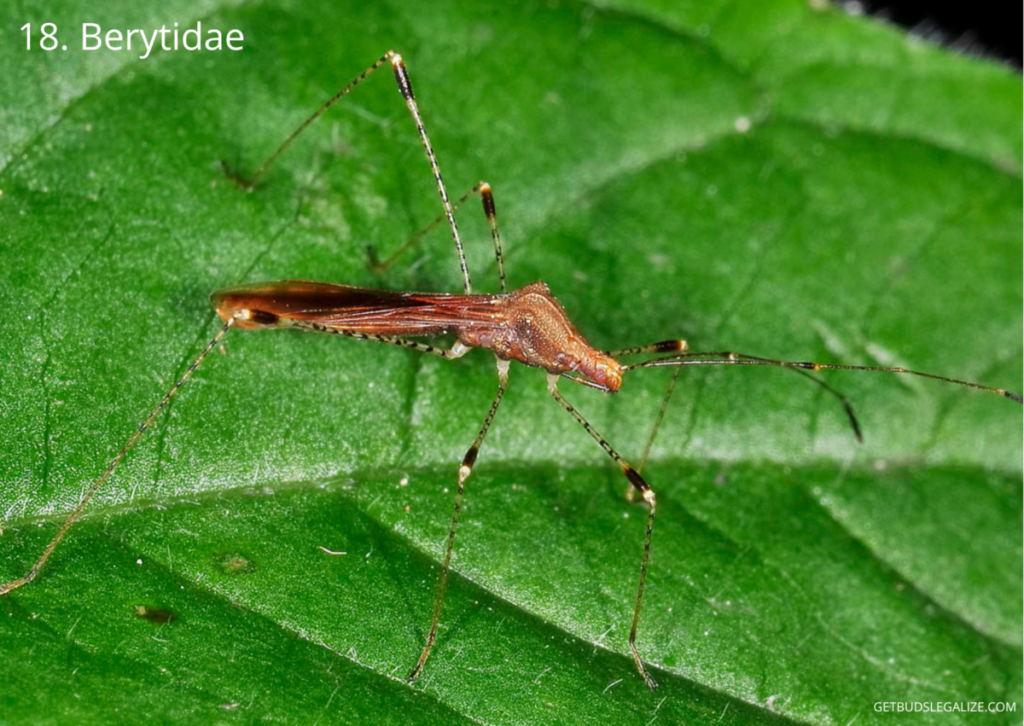
Berytidae, also known as stilt bugs, are small insects that feed on plant sap. They have long legs and antennae and can be brown, black, or green in color. Berytidae can damage cannabis plants by piercing the leaves and stems and sucking out the nutrients. They can also transmit viruses and other pathogens to plants.
How to get rid of Berytidae on cannabis plants?
To get rid of Berytidae, you can use natural predators such as ladybugs, lacewings, or pirate bugs. These beneficial insects will feed on Berytidae and other pests without harming your cannabis plants. You can also spray your plants with a solution of neem oil and water, which will repel Berytidae and kill their eggs. Neem oil is a natural insecticide that is safe for humans and plants.
How to prevent Berytidae on cannabis plants?
To prevent Berytidae infestation, it is important to keep the growing area clean and free of debris. Remove any weeds or other plants that may harbor Berytidae or their eggs. Inspect your cannabis plants regularly for signs of Berytidae damage, such as yellow spots, and wilting or curling leaves.
What are the most common diseases of marijuana plants?
Marijuana plants can be affected by various diseases caused by fungi or bacteria. Some of the most common fungal diseases are powdery mildew, botrytis or bud rot, fusarium or root rot, and leaf septoria. These diseases can reduce the yield and quality of the buds, and even kill the plants if left untreated.
Some of the most common bacterial diseases are tobacco mosaic virus (TMV), verticillium wilt, and damping off. These diseases can weaken the plants’ immune system, stunt their growth, and cause discoloration or wilting of the leaves.
To prevent and treat these diseases, it is important to maintain a clean and optimal environment for marijuana plants, with proper ventilation, humidity control, sanitation, and pest management.
19. Bud Rot Or Mold
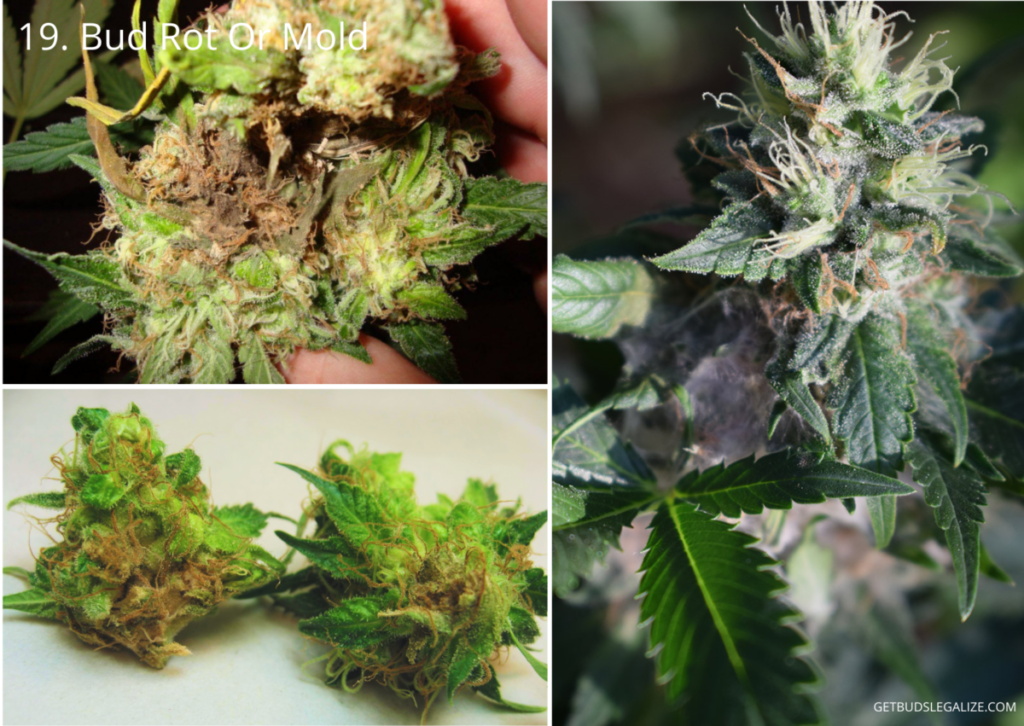
If you are growing cannabis, one of the worst things that can happen is to discover bud rot or mold on your plants. Bud rot is a type of fungus that infects the dense cores of cannabis buds, causing them to decay and turn brown, gray, or black. Bud rot can ruin your harvest and make your buds unsafe for consumption.
Bud rot usually starts on the stem inside the bud and spreads outward. It can be hard to detect in its early stages, but some signs to look for are:
- Yellowing or wilting leaves around the affected bud
- A musty, wet, or sour smell from the bud
- A soft, mushy, or slimy texture of the bud
- White, gray, or black fuzzy growth on the bud
To confirm if you have bud rot or mold on your cannabis plants, you can break apart a suspicious bud and look for signs of decay inside. If you see any discoloration or spores, you have a fungal infection.
If you find bud rot or mold on your cannabis plants, you need to act fast to stop it from spreading and save your crop. Here are some steps you can take:
- Remove all infected buds: Carefully cut off all affected buds with sterile scissors and dispose of them safely. Do not touch other parts of your plant with contaminated tools or hands.
- Check all other buds: Inspect all other buds for signs of infection and remove any suspicious ones. Be thorough and check every nook and cranny.
- Adjust environmental conditions: Lower the humidity, increase ventilation, adjust the temperature, etc., as needed to prevent further fungal growth.
- Consider harvesting early: If you have a severe infection or cannot control the environmental factors that caused it, you may want to harvest your remaining buds early before they get infected too.
- Clean your grow area: After harvesting, sanitize your grow area with bleach or hydrogen peroxide solution. Wash all tools and equipment thoroughly. Replace any contaminated soil or medium.
Bud rot or mold can be devastating for cannabis growers but it can be prevented with proper care and attention.
20. Root Rot
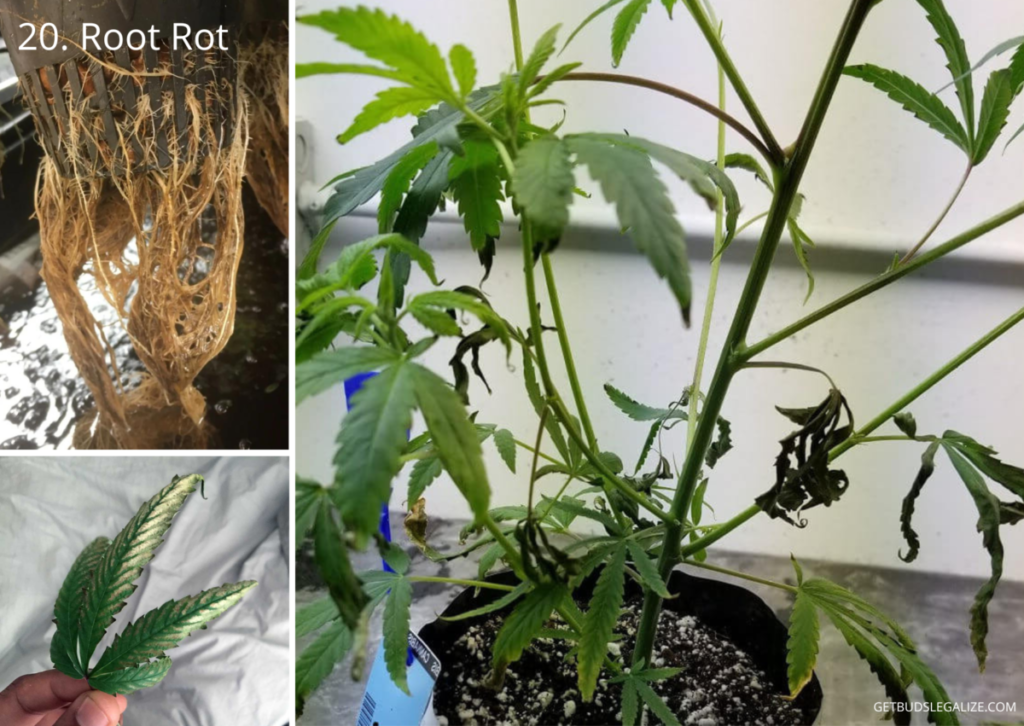
Root rot is a common problem that affects many plants, especially those grown in containers or poorly drained soil. It is caused by various fungi that thrive in wet conditions and attack the roots of the plant, preventing them from absorbing water and nutrients. If left untreated, root rot can kill your plant and spread to other plants nearby.
The symptoms of root rot may vary depending on the type of plant and the severity of the infection, but some common signs are:
- Yellowing, wilting, or dropping leaves
- Stunted or distorted growth
- Brown or black spots on stems or leaves
- Mushy, slimy, or smelly roots
- Soil that stays wet
To confirm if your plant has root rot, you need to inspect its roots. Carefully remove the plant from its pot and shake off as much soil as possible. Healthy roots should be white or light-colored and firm to the touch. Rotten roots will be brown or black and soft or stringy.
If you catch root rot early enough, you may be able to save your plant by following these steps:
- Cut off all the infected roots with a clean pair of scissors or a knife. Make sure to sterilize your tools before and after using them to avoid spreading the fungus.
- Repot your plant in fresh soil that drains well. You can also add some perlite, sand, or gravel to improve drainage. Avoid using soil from your garden as it may contain pathogens or pests.
- Water your plant sparingly until it recovers. Only water again when the top inch of the soil feels dry to the touch. Do not let the water sit in the saucer under the pot.
- Place your plant in a bright location but away from direct sunlight. Sunlight can stress your plant and cause further damage.
- Apply a fungicide to prevent reinfection. You can use a commercial product or make your own by mixing one teaspoon of baking soda with one quart of water. Spray this solution on your plant once a week until it shows signs of improvement.
21. Leaf Septoria
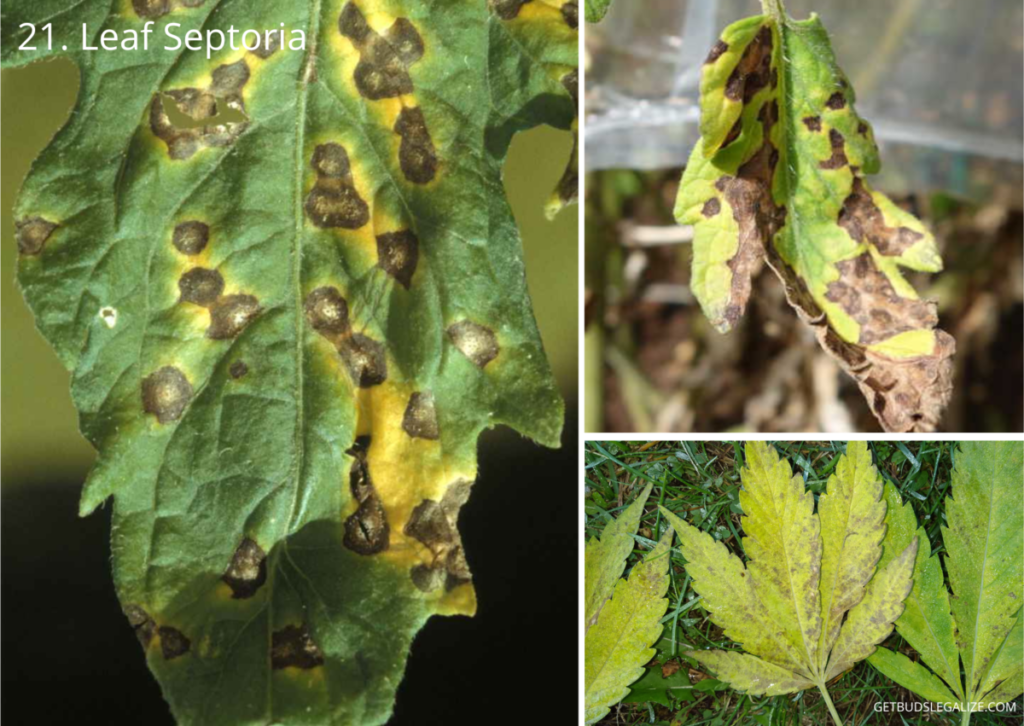
If you are growing cannabis outdoors, you may encounter a fungal disease called leaf septoria, also known as yellow leaf spot. This disease can affect the health and yield of your plants by damaging their foliage and reducing their photosynthesis.
Leaf septoria is caused by a fungus called Septoria Lycopersici, which usually overwinters on dead plant material or weeds. The fungus produces spores that can spread by wind, water, or contact with infected tools or equipment. The spores germinate when the weather is warm and humid, especially during the flowering stage of cannabis plants.
How to Identify Leaf Septoria?
Leaf septoria first appears as small yellow spots on the lower leaves of the plant. The spots may vary in size and shape, but they usually have dark brown edges and tan or gray centers. As the disease progresses, the spots grow larger and coalesce, causing the leaves to turn yellow, brown, and dry. The affected leaves may fall off or remain attached to the stem.
How to Treat Leaf Septoria?
The best way to treat leaf septoria is to act quickly as soon as you notice any signs of infection. Here are some steps you can take to treat leaf septoria on cannabis plants:
- Remove all infected leaves from your cannabis plant and dispose of them properly. Do not compost them or leave them near your growing area.
- Improve air circulation around your plants by pruning excess branches or leaves, spacing them out, or using fans.
- Avoid getting water on the leaves when watering or spraying your plants. Use a drip irrigation system or water at the base of the plant instead.
- Apply a layer of organic mulch around your plants to prevent soil splash and weed growth.
- Remove any weeds that may harbor spores from your growing area.
- Monitor the temperature and humidity levels in your environment and try to keep them moderate and consistent.
- Apply fungicides or natural oils that are safe for cannabis plants, such as neem oil, copper spray, or potassium bicarbonate. Follow the instructions on the label carefully.
How to Prevent Leaf Septoria?
The best way to prevent leaf septoria is to avoid creating conditions that favor its development. Here are some tips you can follow to prevent leaf septoria on cannabis plants:
- Choose a resistant cannabis strain to fungal diseases better than others.
- Start with healthy seeds or clones from reputable sources and avoid introducing any infected material into your growing area.
- Practice crop rotation by changing the location of your plants every season or using different soil mixes.
- Sterilize your tools and equipment before and after using them on your plants.
- Maintain good hygiene and sanitation in your growing area by removing any debris, dead leaves, or weeds regularly.
Leaf septoria can be a serious threat to your outdoor cannabis crop if left untreated. However, by following these guidelines, you can identify, treat and prevent this fungal disease effectively and enjoy healthy and productive plants.
22. Powdery Mildew
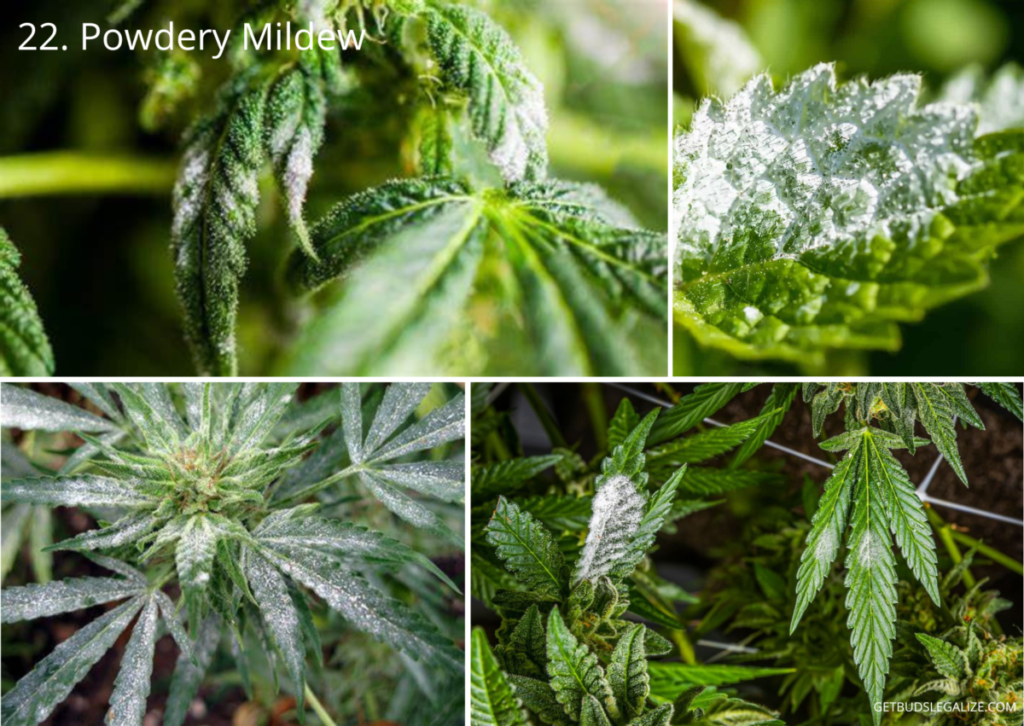
If you are growing cannabis plants, you may encounter a common fungal disease called powdery mildew. This white or gray powdery growth can affect your plant’s health and yield, as well as pose health risks to humans if inhaled or consumed.
Powdery mildew is a term that refers to different fungi that cause a similar symptom: a white or gray powdery layer of spores on the surface of leaves and stems. The fungi that cause powdery mildew on cannabis are usually Podosphaera-Lecanii or Erysiphe Cichoracearum , but there are other species that can also infect cannabis plants.
Powdery mildew spores can be spread by wind, animals, people, or infected plants. They can remain dormant until the environmental conditions are favorable for their growth. Powdery mildew thrives in high humidity (above 55%), moderate temperature (70-80°F), and low light levels. It also prefers areas with poor air circulation and crowded plants.
How to Identify Powdery Mildew on Cannabis?
Powdery mildew on cannabis is easy to spot with the naked eye. It appears as white or gray spots or patches on the leaves and stems of your cannabis plants. It may look like flour, dust, or dandruff on your plants. The spots may grow larger and coalesce over time, covering more surface area of your plant.
Powdery mildew can affect any part of your plant, but it usually starts on the lower leaves and moves upward. It can also infect buds during the flowering stage, which can ruin your harvest and make it unsafe for consumption.
Powdery mildew can reduce photosynthesis, slow down plant growth, weaken plant immunity, and increase susceptibility to other diseases. If left untreated, it can kill your plant or severely reduce its yield.
How to Prevent Powdery Mildew on Cannabis?
The best way to deal with powdery mildew is to prevent it from happening in the first place. Here are some tips to avoid powdery mildew infection:
- Choose resistant strains: Some cannabis strains are more resistant to powdery mildew than others. Do some research before buying seeds or clones and look for strains that have proven resistance to fungal diseases.
- Quarantine new plants: If you buy seeds or clones from an external source, make sure they are free of any signs of disease before introducing them to your grow area. Isolate them for at least two weeks and inspect them regularly for any symptoms.
- Maintain optimal environment: Keep your grow area clean and well-ventilated. Use fans or filters to improve air circulation and reduce humidity levels. Avoid temperature fluctuations and excess moisture on your plants’ leaves.
- Space out your plants: Give your plants enough room to breathe and grow without touching each other. This will prevent spore transmission and improve light penetration.
- Prune regularly: Remove any dead, damaged, or infected leaves from your plants as soon as you notice them. This will prevent spore spread and improve airflow around your plants.
- Apply organic fungicides: You can use natural products such as neem oil, baking soda, apple cider vinegar, or Trifecta Crop Control Super Concentrate as preventive sprays against powdery mildew. Follow the instructions carefully and apply them every week or after rain.
How to Treat Powdery Mildew on Cannabis?
If you already have powdery mildew on your cannabis plants, don’t panic! There are ways to get rid of it without harming your plants or yourself. Here are some steps you can take:
- Isolate infected plants: Separate the affected plants from the healthy ones as soon as possible. This will prevent further contamination and allow you to treat them more effectively.
- Cut off severely infected parts: If some parts of your plant are too covered with powdery mildew spores that they cannot be salvaged, cut them off with sterile scissors and dispose of them safely.
- Wash off spores: You can use water pressure or a wet cloth to gently wipe off the spores from the surface of your plant’s
23. Tobacco Mosaic Virus (TMV)
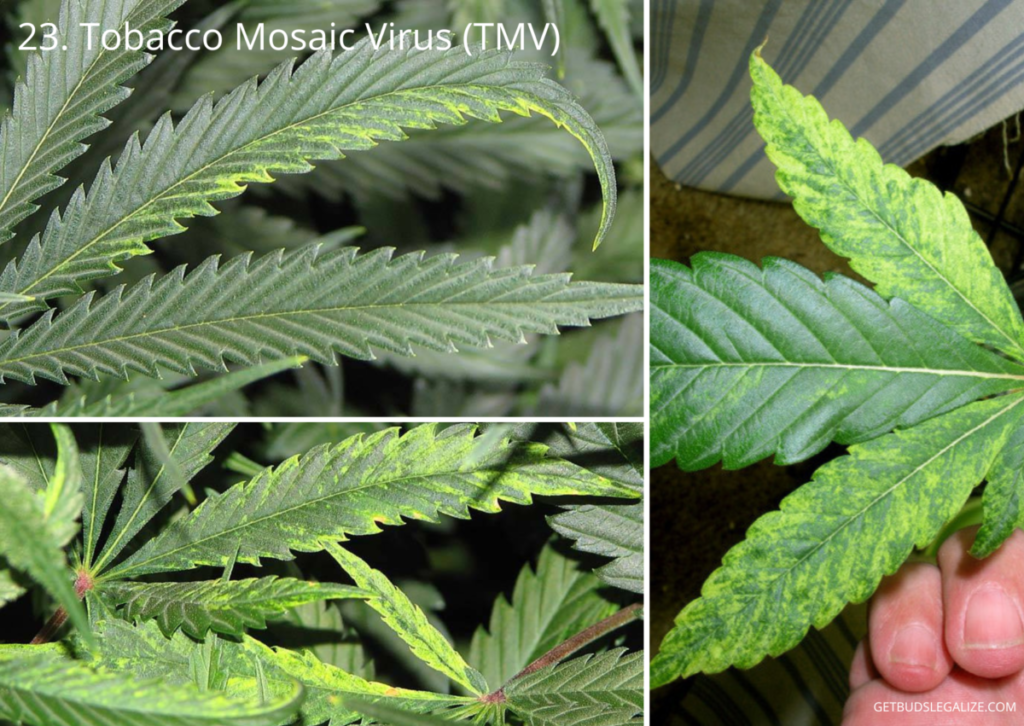
The tobacco mosaic virus (TMV) is a disease that can affect many plants, including cannabis. It was first discovered in tobacco plants in 1892, but since then it has been found to infect over 200 other species. TMV can cause distorted or mottled leaves, reduced growth, and lower yields in cannabis plants. Although there is no conclusive scientific evidence that TMV can infect cannabis plants, some growers have reported seeing symptoms of TMV on their crops.
How to Identify TMV on Cannabis Plants
The most common symptom of TMV on cannabis plants is the appearance of uneven stripes or spots of light and dark green on the leaves. This creates a mosaic-like pattern that gives the virus its name. The leaves may also curl, twist, or deform in shape. The symptoms may affect only one or a few leaves, or they may spread throughout the plant. Some plants may not show any visible signs of infection but still carry the virus.
How to Prevent TMV on Cannabis Plants
The best way to prevent TMV on cannabis plants is to avoid contact with infected plants or materials. TMV can survive for long periods in soil, water, tools, clothing, or even your hands. Therefore, you should always sterilize your equipment and wash your hands before handling your plants. You should also avoid smoking tobacco near your plants or using tobacco products as fertilizers. If you suspect that any of your plants are infected with TMV, you should isolate them from the rest of your crop and dispose of them safely.
How to Treat TMV on Cannabis Plants
Unfortunately, there is no cure for TMV once it infects a plant. The only way to get rid of it is to remove and destroy the affected plant as soon as possible. You should also disinfect any tools or surfaces that came into contact with the infected plant. Some growers claim that applying milk or baking soda solutions can help reduce the symptoms of TMV on cannabis plants, but there is no scientific proof that these methods work.
TMV is a virus that can cause serious damage to cannabis plants if left untreated. It can cause discolored or deformed leaves, stunted growth, and lower yields. The best way to prevent it is to avoid contact with infected materials and practice good hygiene when handling your plants. If you notice any signs of TMV on your cannabis plants, you should act quickly and remove them from your grow space.
24. Verticillium Wilt
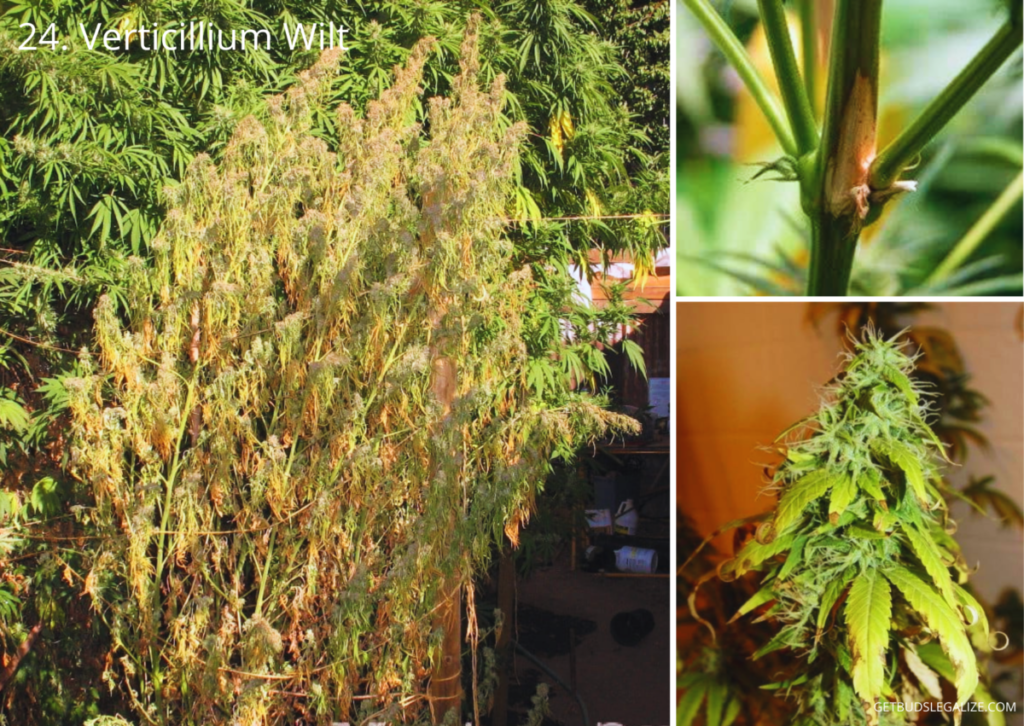
Verticillium wilt is a fungal disease that can devastate cannabis crops by blocking the water and nutrient transport in the plants. It can cause yellowing, wilting, and dying of leaves, stems, and buds. Verticillium wilt can persist in the soil for years, making it hard to eradicate once it infects a growing area.
How to Identify Verticillium Wilt on Cannabis Plants
Verticillium wilt can affect cannabis plants at any stage of growth, but it is more common during the flowering stage when the plants are more vulnerable to stress. The symptoms of verticillium wilt can vary depending on the strain, environment, and severity of infection.
Some common signs of verticillium wilt on cannabis plants are:
- Yellowing, drooping, and dying of leaves, especially at the base of the plant
- Sudden and severe wilting that gets worse in hot weather
- Brown or black streaks on stems or branches
- Gray or brown discoloration of buds
- Reduced yield and quality
To confirm verticillium wilt diagnosis, you can cut open a stem or branch and look for dark brown discoloration in the vascular tissue. You can also send a sample of your plant tissue or soil to a laboratory for testing.
How to Prevent Verticillium Wilt on Cannabis Plants
The best way to avoid verticillium wilt on cannabis plants is to prevent it from infecting your growing area in the first place. Here are some preventive measures you can take:
- Choose resistant strains or seeds that have been tested for verticillium wilt tolerance
- Sterilize your tools, pots, containers, and equipment before using them
- Use clean and well-drained soil or growing medium that has been treated with beneficial microbes or compost
- Avoid overwatering or overfeeding your plants as this can create stress and nutrient imbalance
- Maintain optimal temperature and humidity levels in your grow room or greenhouse
- Monitor your plants regularly for any signs of disease or pest infestation
- Remove any infected plants as soon as possible and dispose of them safely
How to Treat Verticillium Wilt on Cannabis Plants
Unfortunately, there is no cure for verticillium wilt once it infects your cannabis plants. The fungus can remain dormant in the soil for years until favorable conditions trigger its growth again. However, there are some steps you can take to slow down its progression and minimize its damage:
- Prune off any affected leaves or branches carefully without spreading spores
- Apply organic fungicides such as neem oil, potassium bicarbonate, or copper sulfate according to label instructions
- Increase air circulation around your plants by using fans or vents
- Reduce watering frequency and amount until symptoms improve
- Harvest your buds early if they are still salvageable
Verticillium wilt is a serious threat to cannabis growers as it can ruin entire crops with little warning. By learning how to identify verticillium wilt on cannabis plants, how to prevent it from spreading, and how to treat it if possible, you can protect your harvest from this fungal menace.
25. Damping Off
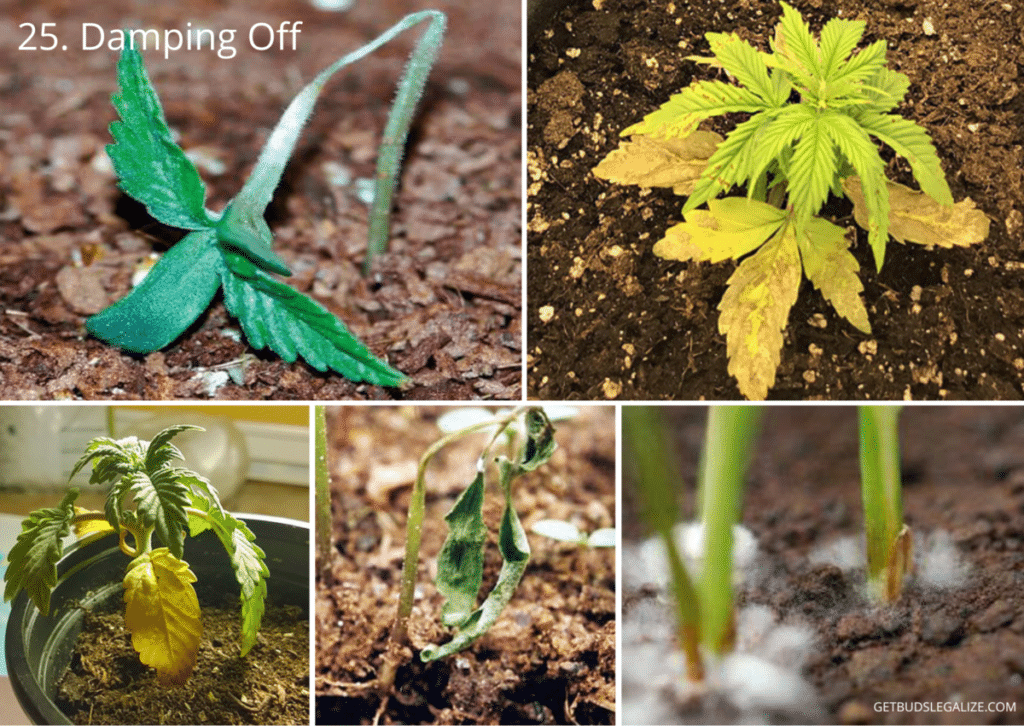
Damping off is a term that describes a fungal disease that affects cannabis seedlings, cuttings, or sprouting seeds. It can cause sudden wilting, discoloration, softening, and collapse of the stem and roots, leading to plant death. Damping off can be caused by various fungi, such as Fusarium, Phytophthora, Pythium, Rhizoctonia, and Botrytis. These fungi thrive in moist, cool, and poorly aerated conditions that favor their growth and infection.
How to Identify Damping Off on Cannabis
The first sign of damping off is usually a thinning or constricting of the stem near the soil line. This causes the seedling to bend over or fall down. The stem may also develop brown or black lesions or cankers that indicate rotting tissue. The leaves may turn yellow or brown and droop. The roots may also be affected by damping off fungi and show signs of decay or discoloration.
How to Prevent Damping Off on Cannabis
The best way to prevent damping off is to avoid creating conditions that favor fungal growth and infection. Here are some tips to prevent damping off on cannabis:
- Use sterile soil or growing medium that is free of pathogens and pests.
- Use clean containers and tools that are sanitized with bleach or alcohol.
- Avoid overwatering your plants and let the soil dry out slightly between waterings.
- Provide good drainage and aeration for your plants by using perlite, vermiculite, coco coir, or other additives in your soil mix.
- Adjust the temperature and humidity levels in your growing environment to avoid extremes.
- Provide adequate light and ventilation for your plants to promote healthy growth.
- Avoid injuring your plants by handling them gently and avoiding transplant shock.
How to Treat Damping Off on Cannabis
If you notice signs of damping off on your cannabis plants, you should act quickly to save them before it’s too late. Here are some steps you can take to treat damping off on cannabis:
- Remove any affected plants from your growing area and dispose of them safely.
- Cut off any infected parts of the stem or roots with a sterile knife or scissors.
- Apply a fungicide spray or powder to the remaining healthy parts of the plant.
- Repot your plant in fresh sterile soil or growing medium with good drainage and aeration.
- Water your plant sparingly with lukewarm water until it recovers.
Some natural remedies that may help treat damping-off include:
- Cinnamon: Sprinkle some cinnamon powder on the soil surface around your plant. Cinnamon has antifungal properties that can inhibit fungal growth.
- Chamomile: Brew some chamomile tea and let it cool down. Water your plant with this tea once a week. Chamomile has antibacterial and antifungal properties that can boost your plant’s immunity.
- Hydrogen peroxide: Mix one part 3% hydrogen peroxide with four parts water. Spray this solution on your plant’s stem and leaves once a day. Hydrogen peroxide can kill fungi and oxygenate the soil.
Conclusion
You are now equipped with the knowledge and skills to grow healthy and happy cannabis plants that will reward you with potent buds. Whether you are dealing with cannabis bugs, fungi, viruses, or nutrient deficiencies, you have learned how to spot the signs, prevent the spread, and apply the best remedy for each problem. You are also aware of the importance of prevention, sanitation, and environmental control to avoid future issues. Now go ahead and enjoy your cannabis cultivation journey with confidence and peace of mind!
FAQ
Small holes in fan leaves can be caused by insects such as caterpillars1 or by fungal diseases such as shot hole disease or Coryneum blight. If you suspect insects, you can pick them off by hand or spray neem oil to prevent and chase them away. If you suspect fungal diseases, you can use a fungicide to treat the plant.
The little white bugs on your plants are generally soft-bodied bugs also referred to as aphids. Mealybugs are another type of white bug that can be found in plants. You can remove the bugs by hand or cotton swab. You can also use a soap spray to kill the bugs.
You can identify plant pests by looking for signs of damage to the plant such as holes in the leaves or discoloration. You can also look for the pests themselves, such as spider mites, aphids, or mealybugs. To better understand you can consult our visual guide on the types of plant. pests
There are many ways to get rid of plant pests. Some natural remedies include spraying with horticultural oil, insecticidal soap, neem oil, or soapy water. You can also use beneficial insects, companion planting, and diatomaceous earth to control pests1. Hydrogen peroxide is also an affordable and easy-to-find solution that many in the gardening world swear by as a treatment for pests.
Neem oil is a vegetable oil that is extracted from the fruits and seeds of the neem tree. It is commonly used in agriculture as a natural pesticide and insecticide1. It is also used in hair care products to help with dandruff and frizz.
Cannabis pest control during flowering is a delicate task that requires careful attention and natural or organic solutions. Pests such as spider mites, aphids, thrips, and fungus gnats can damage the leaves, buds, and roots of cannabis plants if not treated promptly.
However, using harsh chemical insecticides can also harm the plants and the consumers of the cannabis product. Therefore, it is advisable to use beneficial insects such as ladybugs, predator mites, or predatory nematodes that can feed on pest insects without leaving any residue or harmful substances on the plant.
Alternatively, some natural insecticides such as neem oil, garlic spray, or diatomaceous earth can be used sparingly and with caution during the flowering stage.
One of the most common problems that cannabis growers face is the infestation of pests in their grow tents. Pests such as spider mites, aphids, fungus gnats, and thrips can damage the plants and reduce the yield and quality of the harvest. To prevent and control pests in grow tents, growers should follow some basic steps such as inspecting the plants regularly, using clean and sterile equipment, maintaining optimal temperature and humidity levels, applying natural or organic pesticides when needed and removing any infected or dead plant material.
Cannabis red spider, also known as spider mite or tetranychus urticae, is a type of mite that feeds on the sap of cannabis leaves and can cause significant damage to plants. They are very small (0.5 mm) and can be greenish-brown or deep red in color. They can reproduce rapidly and form webs around the flowers, which can reduce the yield and quality of cannabis. Cannabis spider mite prefers warm and dry conditions and can develop resistance to some pest controls.
To prevent and treat spider mite infestation, it is important to regularly inspect the plants for signs of mites, such as small grey dots on the leaves or webs on the buds. Some methods of prevention and treatment include:
- Spraying plant foliage with water frequently increases humidity.
- Using natural products such as potassium soap, alcohol, or hydrogen peroxide.
- Introducing natural predators such as phytoseiulus persimilis, noeseiulus californicus or amblyseius swirski.
- Applying specific chemical insecticides such as acaricides or miticides before the flowering stage.
- Cleaning and disinfecting the grow room, tent, or greenhouse after harvesting.
Convergent Lady beetles, also known as ladybugs or ladybirds, are beneficial insects for cannabis growers. They are natural predators of many common pests that can damage cannabis plants, such as aphids, whiteflies, mealybugs, and spider mites. A single ladybug can eat up to 100 spider mites per day, making them an effective and organic way to control infestations. Lady beetles do not harm cannabis plants or humans, and they can also improve soil quality by feeding on decomposing organic matter. Therefore, lady beetles are not harmful but helpful to your cannabis plants.
Insecticidal soap is a natural and safe solution that can help gardeners control soft-bodied pests such as aphids, mealybugs, spider mites, and whiteflies on their plants. It is made with potassium salts of fatty acids that penetrate and dry out the insects’ cells, causing them to die.
Insecticidal soap can be purchased or made at home with water and soap without any additives. It is applied by spraying both sides of the leaves and any visible insects until they are wet. Insecticidal soap does not harm plants or beneficial insects, but it should be tested on a small area first to avoid any possible damage.
Hemp (Cannabis sativa) is a valuable crop that can be affected by various pests and diseases. Some of the most common ones are hemp russet mites, armyworms, and fusarium. Hemp russet mites are microscopic insects that cause yellowing, curling, and necrosis of leaves. Armyworms are caterpillars that feed on leaves and stems, causing defoliation and damage to buds. Fusarium is a fungal disease that causes root rot, wilting, and stem cankers. These pests and diseases can reduce the yield and quality of hemp, so it is important to monitor the plants regularly and apply appropriate control measures when needed.
ILGM Fertilizer

- From seedling to harvest, give your plants everything they need.
- Enough for feeding at least 5 plants.
- Discounted Package Deal
- Works well in soil and hydroponics
- The best way to treat your plants
ILGM Plant Protector
- Protect your cannabis from diseases and harmful pests.
- Contains three 20 ml bottles.
- Enough supplies to protect 20 plants.
- It can be used in soil and hydroponic

